
")
8 Soccer Conditioning Drills for Elite Fitness (With Images)
The fitness level of your players will play a major role in their chances of being a successful team.
Coaches must use soccer conditioning drills that keeps their player's fitness at an elite level if they truly want to maximise their team's potential.
Remember: A soccer match lasts a long time...
If you want your team to be focused towards the end of a hard-fought game, they must be well conditioned.
It's during these final few minutes that decide a match where players can make poor decisions or silly mistakes due to fatigue.
I've selected the soccer conditioning drills below to include some drills that specifically focus on fitness and others that combine conditioning and skill work together.
If you want to coach a great team this season, don't overlook incorporating the soccer conditioning drills below into your sessions.
8 Soccer Conditioning Drills
1. 3-on-3 Force Making
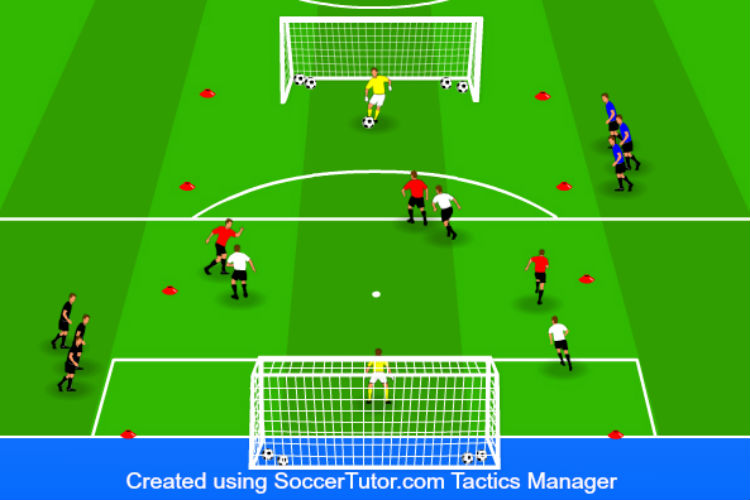
How the Drill Works:
Players compete in a small-sided game of 3v3 to goal. Players can only mark the player they have been matched up with on the opposing team throughout the game creating a more difficult fitness aspect to the game.
Purpose:
Develop fitness and endurance through short, intense games of 3v3. Players must work to stay with and defend their assigned opponent while also using wick cuts and change of speed to create space on offense. Players improve their conditioning while getting game-like play.
Setup:
- Set up a playing area about 25 yards long by 16 yards wide. Put two, full-size goals on each end.
- Place one goalkeeper in each goal. If there are extra goalkeepers, have them rotate at the end of each round.
- Divide the players into teams of three and assign each team to a different jersey color. There should be no more than four teams per field. If there are more than four teams, create another field, or increase the field dimensions to accommodate 4v4.
- Divide all the balls evenly between the goals. Leave the soccer balls inside the goals and note that the goalkeepers are in charge of starting a new ball for their team when the ball goes out-of-bounds on the other team.
- Have two teams start on the field. The rest of the teams start off the field and collect any balls that go out-of-bounds.
- Decide on a time limit for each game. Games should be somewhere between 1-2 minutes. If there are only three teams, then one minute will be plenty given that teams will need to play two games before taking one rest game. If there are four teams, play closer to two minutes since each team will only play one game before resting a game.
- One goalkeeper starts with the ball for their team.
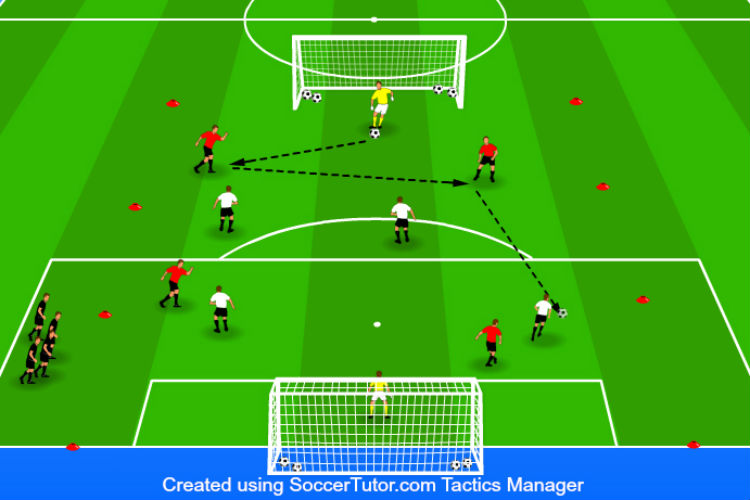
Instructions:
- Before each game, have players match up with one player on the opposing team. This is the player that they must defend, and the only player that can defend them for the duration of that game.
- On the coach’s command, the two teams compete to score the most goals. Players must run and cut to get open, or defend their man-marking opponent.
- After a team has scored a goal, that team’s goalkeeper starts a new ball from their goal. The team that scores get to start with the ball after they score.
- If the ball goes out-of-bounds at any point, the goalkeeper of the team that did not touch the ball last, starts a new ball.
- At the end of the round, the team with the most goals wins. The next team, or teams, rotate in and match up with a player before the coach signals the start of the next game.
- Repeat this process for 5-10 rounds depending on the players’ fitness level and age. If only three teams are playing, give a short break in between each game. If four teams are present, the next game should start as soon as the players have matched up with each other. With four teams, switch who the teams play every 2-3 games which means one team will have to play twice in row at some point.
Variations:
Number of players – Do not play with more than four teams. If 3v3 is not enough, play 4v4, 5v5, or 6v6 to stay under four teams. If that is not possible, create multiple fields and have no more than four teams per field.
Competition – Keep track of team wins to see who is the overall winner at the end of the activity.
Winner stays – The team that won the game stays for the next game. If there is a tie, the team that has been on the longest goes out.
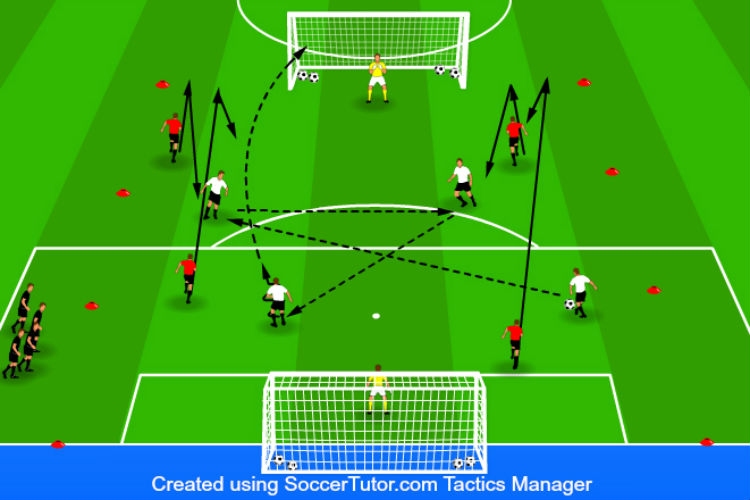
Coaching Points:
- Challenge the players to compete with their matched-up opponent! Players should want to score while also not letting their opponent beat them.
- Encourage the players to constantly move and change direction. This will make them more difficult to defend, and give them a better opportunity to receive the ball with space to create.
- Teach the players to be aggressive with the ball. Players will need to try and beat their opponent 1v1 in this game to score. Players should be decisive and attack their opponent making them difficult to defend.
- Motivate the players to run and defend to get the most out of the activity and increase their game endurance.
2. 4-on-4 Touch the Line

How the Drill Works:
Two teams play against each other to goal with one condition – whenever a team loses possession, they must sprint to touch their own end line before they can attempt to win the ball back.
Purpose:
Multi-purpose, high-intensity small sided game that focuses on game-like scenarios with the added fitness element. Players must constantly move, pass, and dribble to keep possession and score, but then also must sprint back to their end line and defend to keep their opponents from scoring. Increases fitness levels while also getting a lot of soccer movements and decisions accomplished.
Setup:
- Set up a rectangle-shaped playing grid marked off with cones, about 25-30 yards wide and 35-40 yards long. Decrease, or increase, the space depending on the age and fitness level of the players.
- Place a goal on each end line. If goalkeepers are available, use a full-size goal and position one goalkeeper in each goal. If no goalkeepers are available, use mini-goals to carry out the activity. Set up one, or two, mini goals one each line.
- Divide the players into 3-4 teams of 4-5 players. Four players per team is best, but no more than four teams per field. If there are more than four teams, create two fields.
- Assign each team to a jersey color.
- Divide all the soccer balls evenly between the two goals.
- Two teams step on the field with one goalkeeper starting with a soccer ball.
- Decide on a time limit for each round and the number of rounds to be played. 2-3 minutes per game should be plenty.
Instructions:
- On the coach’s signal, the goalkeeper with the ball plays the ball to their team. The team dribbles, passes, moves and attempts to score on their opponent’s goal while their opponents try to win the ball from them.
- If the team on defense wins the ball from the team on offense, the team that lost the ball must sprint and touch their end line before they can attempt to win the ball back.
- Each time a team on defense wins the ball from the team on offense, they must complete three passes before being able to shoot on goal.
- When a team loses the ball, they are attempting to sprint back to the end line as fast as possible and defend their opponents before their opponents can get a good chance on goal.
- If a team successfully scores, their goalkeepers gets a new ball and starts a new possession their team.
- After each round, the team with the most goals is declared the winner of that round. If three teams are available, give the players 60-90 seconds of rest in between each game. If four teams are available, immediately start the next game after the teams have rotated in.
- Have each team play 3-5 games, or has many as needed.
Variations:
Number of players – Play 3v3, 4v4, 5v5, or 6v6 if needed. Change the dimensions of the field as more, or less, players are added.
Touch the sideline – Switch of the location that the players must touch before defending. Have players touch the sidelines, or corners, instead of the end line.
Number of passes – If three passes is too easy, or difficult, to defend, decrease, or increase the number of passes teams must complete before going to goal.
Coaching Points:
- Stress the importance of the sprint and being able to recover on defense quickly before the attacking team can get an easy chance.
- Challenge the players to immediately turn and sprint to the line after a loss of possession. Players should not hesitate when their team loses possession, but rather immediately react with a hard first step towards the end line.
- Encourage the players to communicate with each other on offense and defense. Players should help each other with decisions and push each other to defend quickly.
- Educate the players to move the ball quickly after gaining possession and attack quickly before the opposing team has time to recover and defend.
3. ABC 150s

How the Drill Works:
Players complete three separate running patterns (A, B, and C) with each pattern covering 150 yards. Players rest in-between each pattern before starting the next.
Purpose:
Builds players’ endurance and agility in this high intensity conditioning activity. Players are required to cover the same distance in each pattern, but use different cone paths to complete each run. This makes the players use different steps and agility for each run.
Setup:
- Set up pattern A and B. See diagram for more information. Set up at least two sets of six cones on the outside of the running area. The cone lines should be parallel to each other with about 20-25 yards between them. There should be five yards between each cone along the cone lines.
- Set up pattern C by adding a cone 25 yards directly behind the two top cones of pattern A and B. The two cones should be in the same parallel lines as the cone lines already setup. See diagram for more information.
- Divide the players into 2-4 groups with about 6-10 players per group. Make sure there is enough running space between the two cone lines for the players to run. Increase the distance between the cone lines, or add a third cone line, to give the players more space.
Instructions:
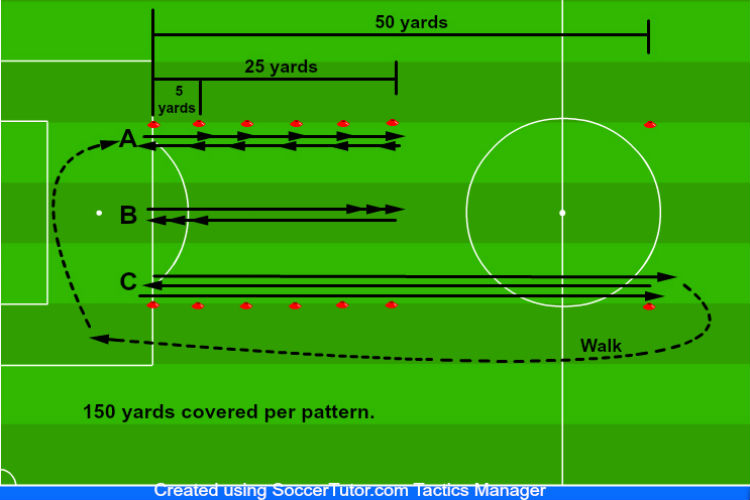
- Players will complete pattern A first. The first group starts between the two cones on the bottom of the setup. On the whistle, players will complete a shuttle between the first six cones. Players will run 5 yards to the first cone, run back to the start line, run 10 yards to the second cone, run back to the start line, and continue this until they run to the last cone, 25 yards away and back to the start line.
- The second group will begin their run after the first group finishes pattern A and the coach blows the whistle for the second group to start.
- Once each group has completed pattern A, the first group will position themselves back on the same start line and complete pattern B. On the coach’s whistle, the first group will run to the 25-yard cone line and back to the beginning three times. Down and back equals one. The next group starts on the coach’s whistle once the group in front of them has completed finished.
- Once all the groups complete one repetition of pattern B, the first group positions themselves back on the same start line and completes pattern C on the coach’s whistle. The first group will run to the far cone, 50 yards away, run back to the start line, and then finish by running back to the far cone. Once the players run through the far cone, they slowly walk back to the beginning. The next group will start once the group in front of them has completed finished and the coach blows to whistle.
- Once all the groups have completed pattern C, they are given 1-3 minutes of rest before completing another round of ABC. Depending on the level of fitness, complete 2-5 rounds of ABC.
- Give the players more rest between each pattern if only one, or two groups of players are used. If players run for 30 seconds, give them 30-60 seconds of rest before starting the next pattern.
Variations:
Use a soccer ball – Complete the same patterns while dribbling a soccer ball. This will result in slower times and less focus on fitness, but still works the players’ endurance while improving their dribbling at high speeds.
Coaching Points:
- Encourage the players to push themselves and to fight through the fitness! Challenge the players to reach every line and not to cheat any distance.
- Motivate the players as the complete the patterns! Give them some motivation and cheers to get the most out of them.
- Make sure the players are properly warmed up before starting this activity. Players should be properly stretched and warm to avoid injuries.
- Read the players to see where they are at fitness wise and how many rounds they should complete. Of course, no injuries should occur, but find the right balance between too much and too little.
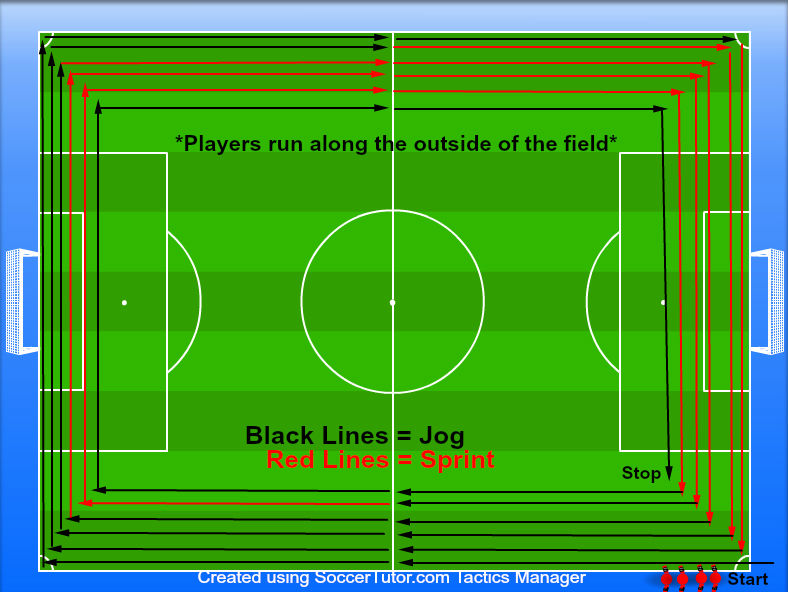
4. Alternating Box Sprints

How the Drill Works:
Players switch between jogging and sprinting around a full soccer field using the outside field lines as markers. The field is divided into six sidelines for this activity. The two end lines, and then the long sidelines are counted as two sections on each side of the field for a total of six sections, or lines. The players start by jogging most of the lines, but finish by sprinting the majority of the lines.
Purpose:
Focuses on developing recovery time between sprints. Players increase their stamina and lung capacity with these increasing sprints in this activity.
Setup:
- A full soccer field is needed for this drill.
- Explain to the players that there are six lines, or sections around the field. The two end lines and then the long sidelines are divided into two lines on each side by the half line for a total of six, almost equal length lines.
- Split the players into two, evenly numbered lines. Position the two lines diagonally across from each other in the corners of the field.
Instructions:
- On the whistle, both groups start jogging around the outside of the field.
- In the 1st lap, the players jog 5 lines, then sprint 1 line.
- In the 2nd lap, the players jog 4 lines, then sprint 2 lines.
- In the 3rd lap, the players jog 3 lines, then sprint 3 lines.
- In the 4th lap, the players jog 2 lines, then sprint 4 lines.
- In the 5th lap, the players jog 1 line, then sprint 5 lines.
- In the 6th lap, the players jog all six lines to recover and finish the round.
- After the round, give the players plenty of rest (4-6 minutes). Players should try to walk around while they catch their breath. Players are encouraged to drink water and recover. Depending on the level of fitness the players are at, or trying to get to, repeat for 1-3 more rounds.
Variations:
Vary the distance – Depending on the players’ age and fitness level, decrease the distance traveled by placing cones inside of the field. Bring the cones as far into the field as needed.
Up and down the ladder – For players with a high level of fitness, have the players complete the first five laps, and then have them work their way back down the order so that they start and finish with jogging 5 lines and sprinting 1 line. 10 laps total. Give plenty of rest after completing.
Coaching Points:
- Encourage the players to challenge themselves during the sprints! Motivate the players to keep pushing themselves and their teammates.
- Congratulate the players each lap they complete and keep them moving.
- Remind the players that a jog is needed in between sprints. Players should not just speed walk, or barely move. An easy jog is the target speed when not sprinting.
- Make sure the players are properly warmed up before starting this activity. Players should be completely stretched out to avoid any injuries.
5. Dribble Patterns

How the Drill Works:
Players partner up and alternate working through a series of dribbling patterns at full speed working. The patters involve turning, cutting, and running with the ball around cones.
Purpose:
Develops a player’s ability to dribble, under control, at high speeds while improving their fitness. Good activity for players to get many touches on the ball and increase their control of the ball as their legs tire from running.
Setup:
- Players partner up with one ball and four cones.
- Each pair of players spreads out across the field and sets up their four cones.
- The four cones will be set up as two cone gates about 8-12 yards away from each other. The gates should be 2-3 yards wide and should be immediately across from each other.
- One player works while the other rests. The first player working will start with the ball behind one of the gates.
- Decide on a time limit that the players will work. 30-60 seconds is the range that the players should work for each round.
Instructions:
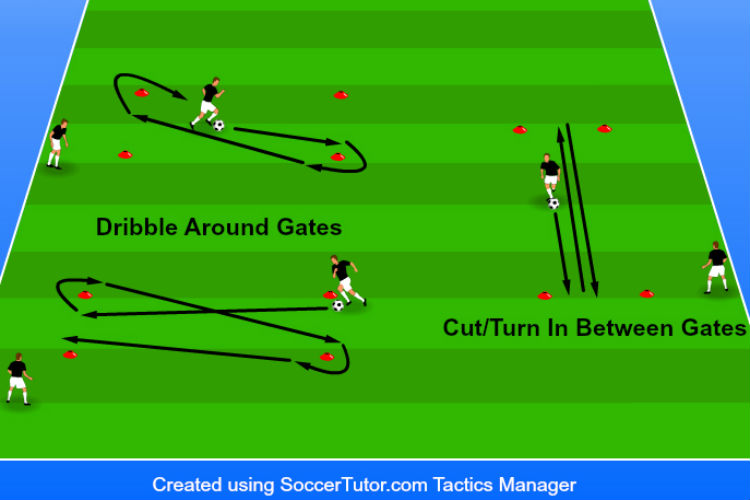
- The first player in each pair starts dribbling on the coach’s command. The player dribbles through the gate they are standing behind and then continues towards their other gate.
- The player dribbles through the middle of the other gate, and then turns with the ball outside of the gate 180 degrees, and then starts dribbling back towards the middle of the first gate to repeat the same process.
- The player working dribbles as quickly as possible during the duration of the round while their partner rests.
- As soon as the coach gives the signal that the first-round time is up, the first player gives the ball to their partner who immediately begins dribbling around the four cones, repeating the same process.
- Continue this process for as many rounds as desired. 8-12 rounds per player is a good starting reference. Mix up the dribbling patterns so players work on different dribbling techniques. See variations for all the techniques that can be achieved using this setup.
Variations:
Original pattern – Use the original pattern described above, but have players use only their left foot for one round, and then have them use only their right foot for the next round. Have players use both feet for the third round.
Cuts – Players can work on their change of direction cuts in this activity. Rather than dribbling through and around the gates, players perform a 180-degree cut with the ball in between their two gates. Players should work on cutting the ball with the inside, outside, and bottom of their feet.
Vary the cone distance – Increase the distance between gates to increase the distance covered by the players. This will result in less turns, but faster dribbling and deceleration.
Vary the workload – Depending on the amount of fitness needed, or the players’ fitness levels, increase the amount of time players work per round and the total number of rounds.
Coaching Points:
- Challenge the players to dribble at full speed. This will increase the players’ abilities to control the ball under that speed while also getting the most out of the activity fitness wise.
- Remind the players to keep the ball close while dribbling so that they can change directions quickly with the ball. Players should take short, quick touches when turning around the cones, but then should take bigger touches that get out in front of their bodies when dribbling to the next gate to get up to speed faster.
- Encourage the players to use both feet when practicing the turns and cuts around the cones.
6. Rectangle Stations
How the Drill Works:
A rectangle is setup inside the field using six cones. The six cones represent a station and an exercise. The players start at cone #1 and work their way around the rectangle performing an exercise at each cone. Players sprint between each cone and start the next exercise as soon as they arrive at the next cone. Players will perform push-ups, sit-ups, and jump squats at the cone stations.
Purpose:
Work on players’ fitness using short sprints and total body exercises to target the players’ lungs and major muscle groups. Players increase their lung capacity as well as their muscular strength.
Setup:
- Use 6 cones to create a rectangle, with at least 15 yards between the cones. Increase the distance between cones to increase the distance of the sprints.
- The cones are numbered from 1 to 6 in a clockwise direction.
- Depending on the number of players present, divide the players into 4-6 groups of 3-4 players.
- Have the group stay together and form a line behind cone #1.
- All the players in group #1 will start first with the exercise at cone #1.
Instructions:
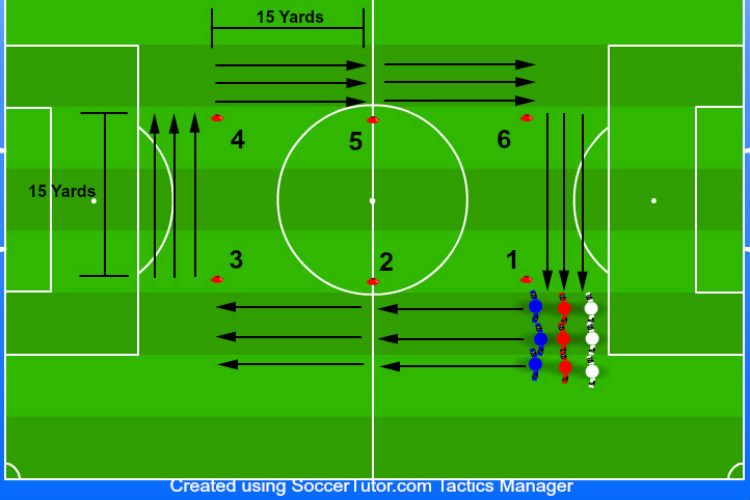
- Group #1 starts at cone #1 with 10 push-ups before sprinting to cone #2.
- At cone #2, group #1 performs 10 sit-ups, then sprints to the cone #3.
- At cone #3, group #1 performs 10 squat jumps (perform by squatting down slowly and then jumping as high as possible out of the squat), and sprints to the cone #4.
- At cone #4, group #1 performs 10 push-ups again, and sprints to the cone #5.
- At cone #5, group #1 performs 10 sit-ups again, then sprints to the cone #6.
- At cone #6, group #1 performs 10 knee jumps, and sprints past cone #1 to complete their repetition and start their rest.
- As soon as a group starts sprinting to the cone #3, the next group in line can start their turn.
- After the last group has finished their trip, have the group rest for 45-90 seconds before having group #1 start again.
- Depending on the fitness level of the players, increase, or decrease, the rest period between each repetition. Have each group of players complete 3-5 repetitions depending on the level of stamina players are at.
Variations:
Strength workload – Increase the number of repetitions players must complete at each station to increase the body strength workload. This will put a larger focus on strength than stamina. Decrease the repetitions at each station to put more focus on the sprints and stamina.
Station exercises – Change up the station exercises. Pick any from the list: jumping jacks, knee tuck jumps, lunges, squats, single leg jumps, crunches, line jumps, mountain climbers, side lunges, etc. Feel free to add others and do what the players need to work on.
Number of stations – Make the rectangle larger and add more cones to add more stations. Decrease the number of stations by taking out cones. At least 4 stations are needed to create the rectangle, but an unlimited amount of stations can be achieved by adding as many cones as desired.
Coaching Points:
- Most important. Encourage the players to challenge themselves and to get the most out of this exercise by not cheating. Encourage them to do full repetitions at each station and to sprint as quickly as they can to the next cone.
- Let the players know that they must run and perform their exercises along the outside of the rectangle.
- Make sure players are properly warmed up and stretched before performing this activity. This should NOT be the first activity of the session. Avoid injuries by making sure this is done after the players’ bodies are ready for the workload.
7. Tempo Runs

How the Drill Works:
Players run the length of a full field at 80-90% their max speed and then jog, slowly, across the width of the field before repeating the same process.
Purpose:
Develop players’ fitness levels in a less injury prone method. These longer runs without quick cuts, or changes of direction help decrease the chances of injury when trying to improve players’ fitness levels. Players decrease the amount of time it takes them to recover between runs.
Setup:
- Full-size field is needed.
- If there are more than 12 players performing this activity, divide the players up evenly and have them start on opposite corners of the field.
- The activity can be run just inside the field if there is not enough space to run along the outside.
- Decide on the number of long runs and rounds the players will complete. For example, 4 rounds of 6 runs, 3 rounds of 8 runs, 2 rounds of 10 runs, etc. For players with a lower fitness level, start with more rounds of less runs per round and then build up to less rounds with more runs per round.
Instructions:

- On the coach’s signal, the players run the length of the field at 80-90% of their max speed. Players should open their stride length and run all the way until they reach the line before slowing down.
- As soon as players reach the end line, they slowly jog across the width of the field until they reach the sideline where they turn and run at 80-90% max speed the length of the field.
- The process continues for the remainder of the round before players get to rest and fully recover. After the round is complete. Let players rest, drink water, and walk around before starting the next round. If each round takes 5-8 minutes to complete then allow the players to rest 3-4 minutes between each round. Increase the amount of resting time if players are struggling and need more time to recover.
Variations:
Penalty box – Decrease the distance run by having players use the penalty boxes as their lines. Players run from one box to the other and then jog across the top of the box before running again. This decreases the distance of the run, but also decreases the amount of rest in between each run.
Build-up and slow-down – To further decrease injury risks, use the top penalty box lines as markers for the players to build-up and slow-down their runs. Players still run along the edge of the field, but build up to their run speed by the time they get to the top of the penalty box, run at 80-90% max speed to the top of the opposite penalty box, and then slowly decelerate until they reach the end line.
Walk between runs – If players are struggling with the recover run, have them simply walk across the field before running again. This will give them more recovery time and will help them get the most out of the runs.
Recovery leg work – This activity is also good for light training sessions after games. Decrease the max speed percentage to 70-80%, and have players walk between runs. This is good for getting players to open their legs up and get the soreness out of their legs. Complete 5-8 minutes of this at a healthy pace to help players legs recover properly.
Coaching Points:
- Encourage the players to push themselves and their teammates to work through the discomfort.
- Players should open their strides up and cover ground with each step.
- Remind players to breathe and recover during their jogs and rest periods in between rounds.
- Motivate the players through each run and keep them moving!
8. Tic Tac Toe Sprints
How the Drill Works:
Players sprint back and forth between a tic tac toe setup trying to place their team’s jersey color in a winning formation. Two teams compete at each setup and take turns running out to the box to move their team’s jersey markers until one team gets three in a row.
Purpose:
Fun activity for players to compete against each other while also building fitness through repeated sprints. Players increase their max speed and quickness.
Setup:
- Divide the players into teams of 3-4 players. If possible, use an even number of teams so that no team must sit out.
- Depending on the number of teams create a tic tac toe box for every two teams. Use cones, or agility hopes to create the game.
- Set up a cone gate, 3-4 yards wide, 25-35 yards away from each tic tac toe box. This will be the gate players must start at before sprinting to and from the box.
- Assign two teams to each cone gate and have each team form a line behind each cone on the gate.
- Give three colored jerseys to the first three players in each team line. The two teams competing against each other must have different jersey colors.
- Players keep the jerseys in their hands and will place them inside the box when it is their turn.
Instructions:
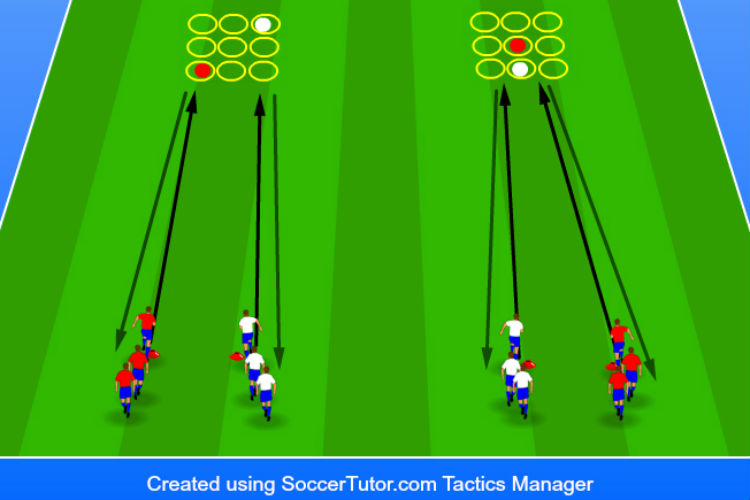
- On the coach’s signal, the first player in each team line sprints to the tic tac toe box, places their jersey down inside one of the nine small squares and then immediately sprints back to the starting line to tag their partner’s hand.
- Has soon as the next player’s hand is tagged, they are free to sprint to the tic tac toe box, place the second jersey down and then sprint back to tag their next teammate’s hand.
- The third teammate sprints to the box to repeat the process and lay down the third jersey.
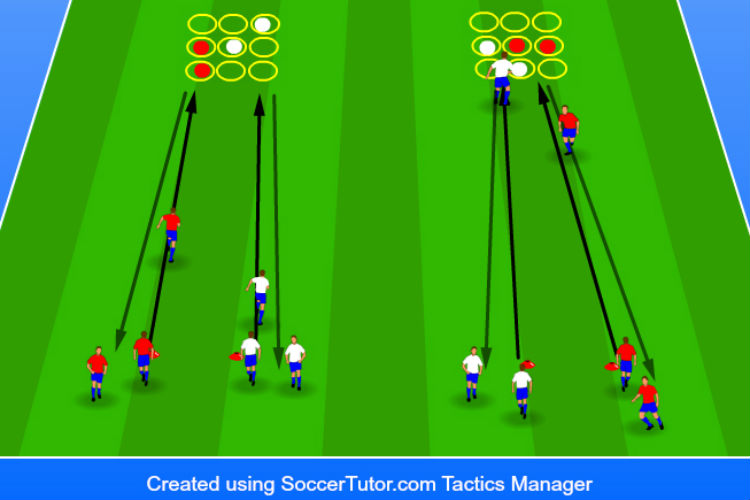
- If the third jersey wins the round with a three in a row then the round is over and players rest and reset for the next round.
- If the third jersey for either team does not win the round, then the third player who just laid the last jersey, sprints back and tags the next player’s hand. The next player will either be the 4th player on the team, or the 1st player, depending on team sizes.
- As soon as the next player’s hand is tagged, they sprint out to the box and move one of their team colored jerseys to try and get three in a row. The process continues moving team jerseys until a team gets three in a row and wins the round.
- After a team wins, give the players a little bit of rest, reset the activity before repeating again.
- Play for as many rounds as needed. Switch up who teams compete against if possible.
Variations:
Run with the ball – Incorporate a soccer ball into the activity. Have players dribble a soccer ball to and from the tic tac toe box before giving it to their next teammate to repeat the process.
Add obstacles – Add sticks, cones, or ladders that players must run around, or through, as they sprint towards the tic tac toe box. This will make the activity more difficult and can work on players’ agility at the same time.
Coaching Points:
- Challenge the players to sprint as quickly as they can to and from the tic tac toe box.
- Remind players to choose quickly and smartly when laying their team jersey down.
- Encourage the players to help their teammates out and to push them to get the most out of the activity.
- Remind the players that this should be an enjoyable activity, but that they also need to get some fitness out of it.
Want to Improve Your Team's Skills?
Make sure you check out the other 123 soccer drills that are posted on our website.
These includes:
- Shooting Drills
- Passing Drills
- Conditioning Drills
- Defensive Drills
- and more