

14 Soccer Shooting Drills to Finish Past Any Goalkeeper
If you want to develop players who can score past any goalkeeper, you need to be using the best soccer shooting drills during your practices.
There's nothing worse than a team executing great ball-movement down the field and setting up a great scoring opportunity only to miss an easy goal...
Start by reading my 9-step shooting technique guide, and then use the following soccer shooting drills to allow your players to practice all aspects of finishing around the goal.
From controlling and scoring off a cross, finishing using one-touch, shooting off the dribble, using a teammate advancing up the field, and much more.
Let's get started...
14 Soccer Shooting Drills
1. 1, 2 Shoot

How the Drill Works:
A line of players, each with a soccer ball, pass to the designated passer at the edge of the penalty area who lays the ball off for the player to run onto and shoot on goal.
Purpose:
Simple drill designed to increase a player’s finishing skills. This activity keeps things simple and allows players to get many shooting repetitions to develop their accuracy.
Setup:
- Players form a line starting about 8-12 yards outside the penalty area.
- Each player in line should start with a ball at their feet.
- Designate one player to be the passer and position them on the edge of the penalty box facing the line of players. This player does not need a ball.
- If available, put a goalkeeper in the full-size goal. Any extra goalkeepers should stand off to the side of the goal and switch into the activity every 3-5 repetitions.
Instructions:
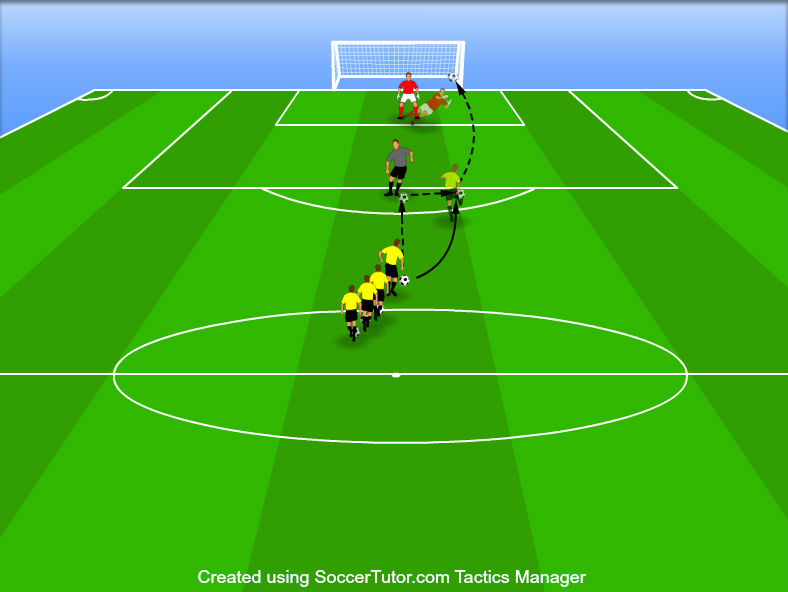
- The first player in line starts the drill with a pass to the passer positioned at the edge of the penalty area.
- The passer takes one, or two touches, and lays the ball to either side of them for the player to run onto to and shoot.
- The shooting player runs onto the ball and immediately takes a shot on goal.
- After the first player has completed their turn, the next player in line cam immediately begin their turn.
- Players should retrieve their own shots before returning to the line.
- Switch the designated passer every 8-10 repetitions.
- Continue this process for 5-10 minutes, or until the soccer balls need to be retrieved and goalkeepers need a rest. Repeat for as many rounds as needed.
Variations:
One touch – Depending on the age and skill level of the players, give the players only one-touch to complete the drill.
Various shooting techniques – Have the players use different techniques when shooting – inside of the foot, instep (laces), or outside of the foot.
Coaching Points:
- Stress that players should “finish” the soccer ball rather than just shoot the ball. Players should place the ball into the corners of the goal with accuracy instead of just trying to hit the soccer ball as hard as they can.
- Teach the players to focus on using a strong plant foot alongside the ball, and to keep their head down and eyes on the ball when finishing. Players should lock their ankle and strike through the ball smoothly, hitting the middle of the ball for a quality technique.
- Remind the players to lock the ankle of the shooting! This is the most important rule when developing good shooting habits. Locking the ankle will provide better control and power on the ball.
- Educate the players to follow through their shot with their shooting foot. A player’s shooting foot should swing through the shot and players should land on their shooting foot to improve accuracy and power.
- Challenge to the players to be consistent with their technique and trust the process. Help players who are struggling be patient and focus on the right technique first before attempting to go at faster game speed.
2. 1-on-1 Shootout
How the Drill Works:
Two players compete against each other shooting the ball at one another’s cone gate. Players must defend their own goal from their opponent’s shots and attempt to score on their opponent’s goal. The player with the most goals scored at the end of each round is the winner.
Purpose:
Simple activity for players to develop their finishing skills. Players get many repetitions in a short period of time and can make it as competitive as they want to.
Setup:
- Have players divide up into pairs. Each pair should have at least one soccer ball.
- For each pair of players, set up two gates using cones, about 8-12 yards away from each other. Each gate should be 5-7 yards wide and should be facing the other gate. Increase, or decrease, the width and distance of the gates depending on the players’ age and skill level.
- Each pair of players positions themselves inside the two gates. Each player should be between a cone gate directly across from their partner.
- One player in each pair starts with the ball at their feet.
Instructions:
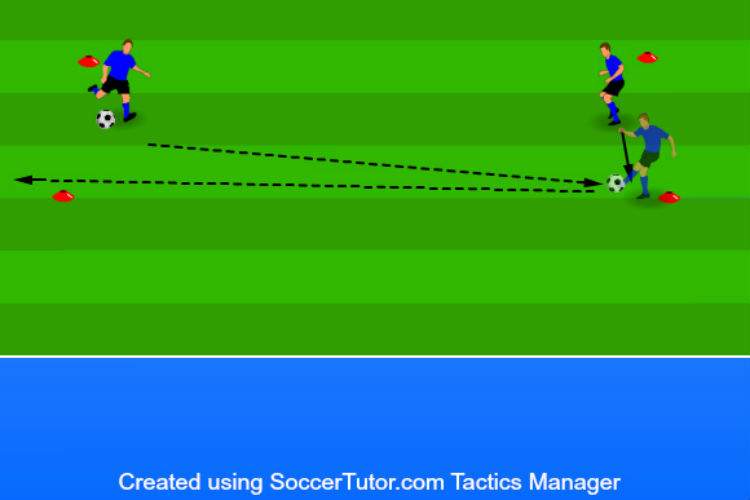
- To start, the player with the ball in each group takes a shot on their opponent’s cone gate while their opponent, without the ball, attempts to block the shot from crossing their cone gate.
- Once the player has scored, or their shot has been blocked, their opponent attempts a shot on their cone gate. The process continues in this manner for the remainder of the round.
- Only shots below the opponent’s waist are allowed. Each time a player successfully shoots the ball, below their opponent’s waist, and past their opponent’s cone gate, the shooter is awarded one point.
- The players take turns shooting the ball at each other’s cone gate for the entire round with the winner being the player who has scored the most points by the end of the round.
- Switch partners at the end of each round. Play each round for 2-4 minutes. Repeat for as many rounds as needed.
Variations:
Vary the distance – Increase or decrease the distance between the gates depending on the players’ age and skill level.
Shot-blocking rules – Switch up the shot-blocking rules. Allow players to use hands to increase the difficulty to score. Allow only feet for players to work on tough receiving and blocking skills with just their feet.
Coaching Points:
- Get the players excited to compete against one another and make sure they enjoy the competition. Change up the rules and distances to make sure the activity fits the age and competitiveness of the group.
- Educate the players on the proper shooting technique before playing. Depending on the distance between the gates, players might only need to use the inside of their feet for the best chances to score. Of course, laces can be used, but be careful with shot power if players are too close to each other.
- Players should have a strong plant foot next to the ball before smoothly striking through the ball with a locked ankle. This will result in the most consistent shot and help players develop their accuracy.
- Challenge the players to block as many shots as possible and to make it difficult for their opponent to score.
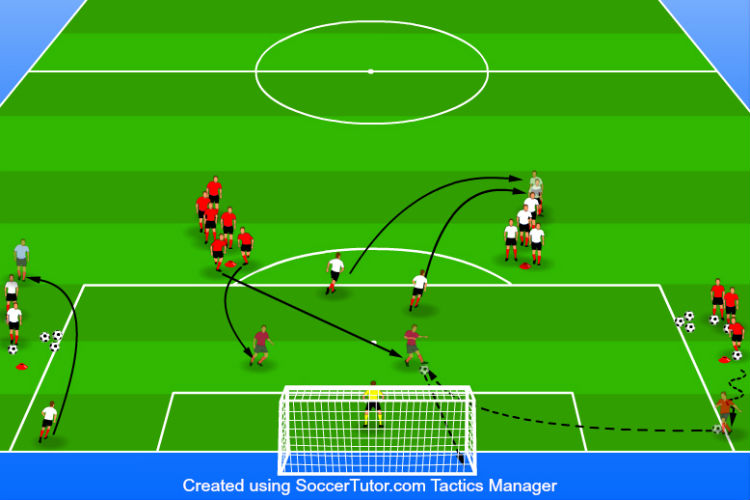
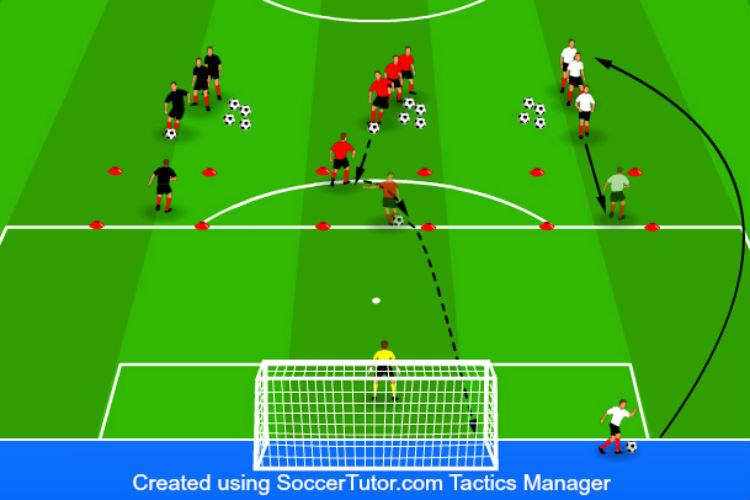
3. Cross and Finish Competition
How the Drill Works:
Two teams compete to score the most goals in a round. Each team alternates crosses from opposite sides of the field while two players enter the penalty area and attempt to score on goal.
Purpose:
Develop crossing and finishing skills in a competitive team activity. Players increase their crossing accuracy while players in the box improve upon their finishing consistency.
Setup:
- Setup one, full-size goal on one end of the field.
- One goalkeeper is needed for this drill. 2-3 goalkeepers would be best due to the high intensity level and number of repetitions per round. Extra goalkeepers should position themselves off to the side of the goal and rotate in every 3-5 repetitions.
- Setup one cone on each side of the penalty area. Each cone should be 2-5 yards outside the penalty box and 5-10 yards from the end line. Increase, or decrease, the cone distance and angle to the goal as needed.
- Setup two cones at the top of the penalty box. The cones should be 10 yards apart and should be 2-3 yards outside the penalty box.
- Divide the players into two, evenly numbered teams and assign each team to a jersey color.
- Assign each team to a cone at the top of the box. Each team should form a line behind their cone.
- Have each team send 3-5 players to the outside cone furthest away from them. These players will be the designated crossers for the round and should form a line behind their cone.
- Split the soccer balls evenly between the two crossing cones.
- Each crosser in line should have a ball at their feet.
- Decide which team will go first.
Instructions:
- On the coach’s command, the first crosser in line, for the team going first, takes a touch towards the end line, and then crosses the ball into the box.
- The same time the crosser takes a touch, two players from the crosser’s team, at the top of the box, begin their runs into scoring positions, inside the box. One player should run to the front post, while the other player should run to the back post.
- The two players running into the box attempt to score, first time, off their teammate’s cross.
- As soon as the first team finishes their turn, the second immediately begins theirs. The second team crosser, on the opposite side of the box from the first team crosser, takes a touch towards the end line and then crosses the ball into his teammates who have run into scoring positions.
- After each turn, the crosser goes to the back of their team’s crossing line while the shooters retrieve their shot and pass it, out of the way, towards the crossers.
- The two teams alternate crossing and finishing in this manner for the remainder of the round. The team with the most goals scored at the end of the round wins.
- Play each round for 3-5 minutes before resting and retrieving all the soccer balls. After each round, switch team crossers and have team switch sides so that they cross and finish from both sides.
- Repeat for as many rounds as needed.
Variations:
Cross Variations – Switch up the crossing angles and distances. Crosses can also be on the floor or in the air depending on the rules decided upon.
Number of shooters – Depending on the number of players available, increase, or decrease, the number of players running into the box to finish. 1-3 shooters works best.
Coaching Points:
- Educate the players on their runs into the box to score. Players should time their runs precisely to arrive at their scoring position at the same time as the ball. The timing of the runs is the most important part to scoring consistently. Players need to be in good scoring positions to help their team score.
- Challenge the players crossing to deliver consistent services into the box. Crossers should try to pick out a player and serve it into their running path.
- Teach players that a powerful swing is not needed to score consistently. Players should be reminded, and taught, that they need to lock their ankle and redirect the ball with a small swing of the leg. The players’ forward running momentum will supply the power needed to put the ball in the back of the goal.
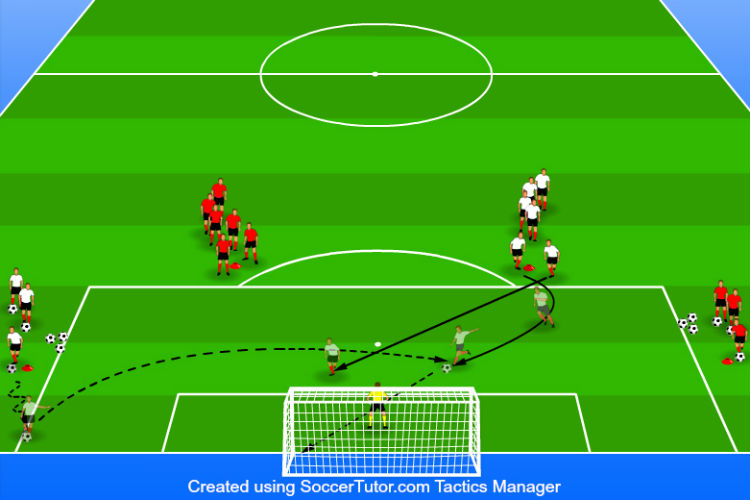
4. Cross Control
How the Drill Works:
Players inside two boxes located on the edges of the penalty box receive and finish crosses from the players on the wings. Players inside the boxes must control their first touch and then finish the ball on goal.
Purpose:
Develops a player’s ability to take a pass out-of-the-air and set themselves up for a shot on goal. Players increase their first touch ability and shooting and crossing skills.
Setup:
- Use the cones to mark two boxes around the edge of the penalty area. The boxes should be about 3-4 yards wide.
- Designate two players as the crossers and position them outside the penalty area along the end line.
- Divide all the balls up evenly between the two crossers.
- The rest of the players divide evenly and form two lines above the marked boxes.
- One player from each line steps into the box and prepares to receive the cross.
- If a goalkeeper is available, place them in front of the full-size goal. Any extra goalkeepers can stand to the side of the goal and rotate in every 3-5 repetitions.
Instructions:
- To start the drill, one designated crosser serves the ball, in the air, diagonally across the penalty area, to the player in the box furthest away from them.
- The player inside the box receives the ball out of the air and the attempts to score on goal in the least amount of touches.
- As soon as the player shoots, the second crosser can serve the next ball to the other player standing in the opposite box and repeat the process.
- Players receiving the crosses must start inside the box, but depending on the accuracy of the cross, they are free to move outside of the box to meet the ball and complete their turn.
- Receiving players are free to use their feet, thighs, chest, or head to control the ball out-of-the-air and finish as quickly as possible.
- After players shoot, they retrieve their ball and pass it in the direction of the closest crosser and then go to the back of the opposite line they just shot from.
- After 2-4 minutes, rotate the crossers and collect any extra soccer balls that are not near the two crossers.
- Continue for as long as needed.
Variations:
First touch towards the middle – Players attempt to take their first touch towards the center of the area before shooting on their second touch.
Pass to the teammate – Two players enter each box at a time. One player receives the pass out-of-the-air and attempts to lay it for the other player to finish on goal.
Keep the ball up – For higher skilled players. Players must keep the ball in the air when receiving the cross and strike the ball out-of-the-air when shooting.
First-time finish – For higher skilled players. Players must shoot the ball off the cross using one-touch.
Coaching Points:
- Encourage the crossers to focus on their accuracy and be consistent with their services. Crosses should aim to drop the ball on the player in the opposite box every time.
- Challenge the players to try various shooting techniques (driven, side foot, lob, placed, curl, etc.) and try to finish as quickly as possible. Players should aim to finish in two-touch, but are free to take more touches to get control of the ball before finishing.
- Teach the players to focus when receiving the ball out-of-the-air and to have a soft first touch. Players should not tense up before receiving the ball, but rather a relaxed and control body that will provide a quality soft first touch.
5. Diagonal Shooting
How the Drill Works:
Set up two goals on each end of the playing area with one line of players on the side of each goal. Players pass the ball diagonally across the playing area for the opposite player to receive and beat the goalkeeper to score on the goal that the ball was passed from.
Purpose:
Develops a player’s receiving skills on the move and their ability to beat the goalkeeper to score. Players increase their 1-on-1 finishing skills as well as their ability to pass over distance. Goalkeepers improve their reaction saves as well as their 1-on-1 stopping ability.
Setup:
- Use four cones to mark a square grid about 25-30 yards wide. Increase, or decrease the size of the space depending on the players’ age and skill level.
- Place a full-size goal in the middle of each end line.
- Assign at least one goalkeeper to each goal. If there are more goalkeepers available, have the extra goalkeepers stand off to the side of the goal and rotate in every few repetitions.
- Divide the players into two, evenly numbered groups. Have each group of players form a line at the corner cones of the square, diagonal from each other.
- Divide all the soccer balls evenly between the two lines.
- To start, one player at the front of the two lines should have a soccer ball at their feet, while the player diagonal from them should not.
Instructions:
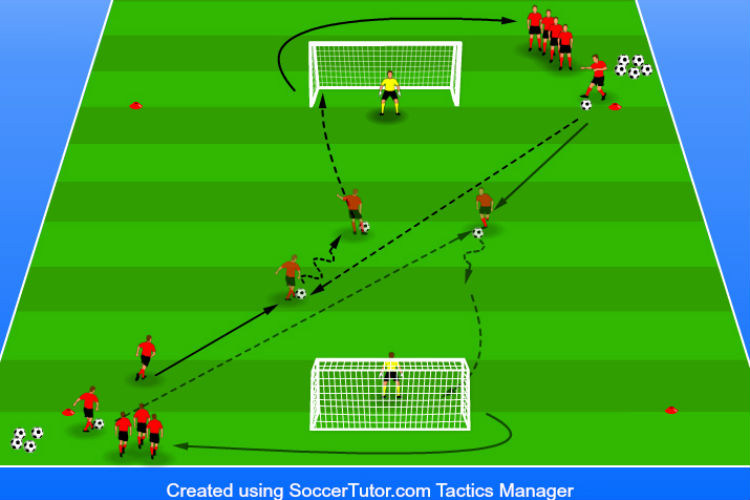
- To start the activity, the player without the soccer ball, at the front of the line, begins to run diagonally across the square.
- The player at the front of the opposite line, with the soccer ball, passes the ball to the player who is running towards them.
- The player on the run, receives the pass, and takes one, or two, touches before finishing on the goal they are running towards.
- After the player shoots, they retrieve their ball, and go to the back of the opposite line that they started from. As soon as the player shoots, the player who passed the ball to the runner, now begins to run diagonally across the grid towards the opposite goal.
- The player in the opposite line of the runner, passes the ball to the player running and the process continues for the remainder of the round.
- Continue the activity for a set time (2-3 minutes, for example) . After each round, the players should rest and switch corner cones so that they attack from the other angle. Repeat for as many rounds as needed.
Variations:
Two touches – Players must receive and finish using only two touches.
One touch – Players must finish directly off the pass using one touch. Players passing the ball should time their pass so that the shooter is about 14-20 yards when they strike the ball.
Competition – Players keep track of their total goal tally. Each goal is one point. Announce a winner, or winners, at the end of each round. Players are free to finish in as many, or as little, touches as they want.
Vary the distance – Increase or decrease the size of the grid depending on the players’ age and skill level, so that the players have enough space to pass and finish properly.
Coaching Points:
- Encourage the players to receive the pass on the run and to focus on their first touch. Players should use their first touch to keep their run forward and finish without having to slow down too much. Being able to have a good first touch out in front of the body will allow players to score more easily and more consistently.
- Teach the players to give good passes on the ground to the players running on to them. The passes should be firm and on the ground so the player receiving them can have an easier time receiving them.
- Challenge the players to try various shooting techniques. Players should focus on accuracy and power and when to use each one. Players should work to find what works best for them and perfect that technique.
- Educate the goalkeepers to stay on their toes and to react quickly to the approaching players.
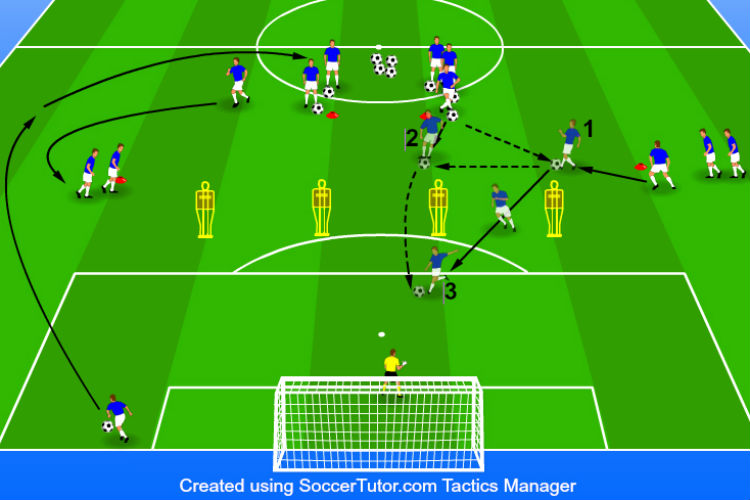
6. Final Pass and Finish
How the Drill Works:
Two players complete a series of passes together before one player runs behind the mannequins, (positioned to replicate an opponent’s back four defense) to receive a final pass from their teammate. The player running behind the back four, times their run to stay onside before receiving the through ball and finishing on goal.
Purpose:
Develops players passing, timing, and finishing skills in a game-like setting. Passers work on their final pass that breaks through the opponent’s defense and into the path of their teammate. Players shooting work on their timing of their run and their ability to score.
Setup:
- Set up one full-size goal on the end line.
- One goalkeeper is needed for this activity and is positioned in goal. If there are extra goalkeepers, have them stand off to the side of the goal and rotate in every 3-4 repetitions.
- Set up four mannequins about 5-7 yards outside of the penalty area. The mannequins should all be parallel to the top of the penalty area line and should have 5-7 yards of space between each other. The mannequins are used to replicate an opponent’s defense. Use sticks, or cones, if mannequins are not available. See diagram for more information.
- Set up four cones like to diagram below shows. Two cones should be placed 15-18 yards in front of the two center mannequins, while the other two cones should be placed 6-8 yards in front and just to the outside of the wide mannequins.
- Have the players divide evenly between the four cones and form lines behind each cone.
- Place all the balls between the two center cones at the top of the activity. Each player in these lines should start with a ball at their feet.
Instructions:
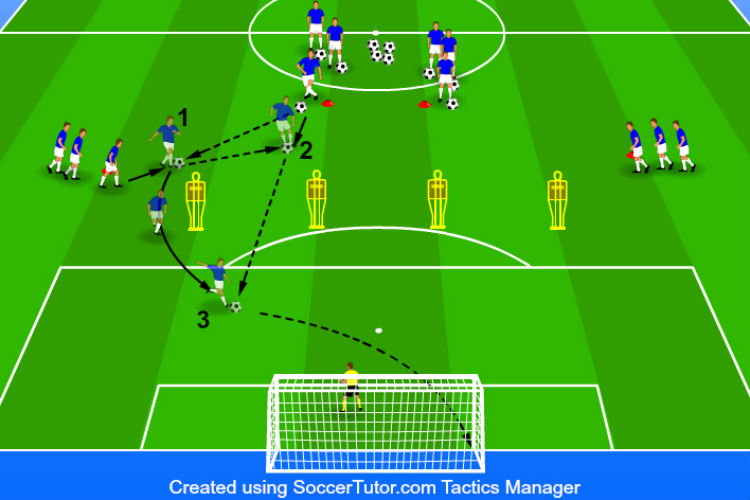
- When facing the goal, the first players in each of the right two lines go first. The player at the top cone starts with a pass to the wide player to the right of them.
- The wide player receives the pass and lays the ball back to the top player who passed it to them.
- As soon as the wide player lays the ball off, they start their run towards the mannequins while the top player approaches the lay-off.
- The wide player times their run to stay onside before the top player passes the ball through the mannequins and into the wide player’s running path.
- The wide player receives the ball behind the mannequins and attempts to finish on goal.
- Once the right side has completed their turn, the left side lines immediately begin their turn. The left side completes the same pattern as the right side.
- The player who made the final pass goes to the back of the wide player line while the shooter retrieves their shot and goes to the back of the line at the top cone on their side.
- The wide players are free to run behind any of the mannequins on their side of the field. The runner and the passer must communicate the run and where the final pass should be played.
- Continue this process for 5-8 minutes before resting and retrieving any lost soccer balls. Have the players switch sides so that they work the left, and the right, side of the field.
- Repeat for as many rounds as needed.
Variations:
One touch – Players must complete the whole sequence in one-touch.
Various passing combinations – This setup allows for numerous passing patterns. Be creative and use more cones, or different passing angles to create different passes and finishing combinations.
Coaching Points:
- Educate the players on the importance of the timing of their run. Runners must not break the line of defenders before the ball is player otherwise they are in an offside position. Runners should communicate where they want the ball to make the passers job easier.
- Teach the players to focus on the weight of their pass to the runner. The final pass should be placed in front of the runner so that they can score more consistently.
- Remind the players to communicate with each other and to give their partners the right pass and the right weight to make the combination come off smoothly.
- Challenge the players to increase the speed of play to make the drill as game-like as possible.
- Encourage the players to pick out their spot before shooting the ball by looking at the goalkeeper before looking at the ball to finish. Players should be aware of the goalkeeper’s position before striking the ball on goal.
7. First to Finish
How the Drill Works:
Players are divided into two teams with one player from each team competing at a time. Each team has their own goal and cone that the players must dribble around before shooting. The first player to score wins a point for their team. The team with the most points at the end of the round wins.
Purpose:
Competitive activity for players of all age groups. Challenges players to dribble and shoot at speed. Players develop their ball control and finishing skills under game like speeds.
Setup:
- Place two full-size goals on one end line of the field. The goals should be 10-15 yards apart from each other.
- Place one goalkeeper in each goal. If there are extra goalkeepers available, have them stand to the side of the goals and rotate in every 2-3 repetitions.
- If there are no goalkeepers available, replace the full-size goals with mini goals.
- Place one cone about 18-20 yards away from each goal. Decrease, or increase, the distance the cone is away from the goal depending on the players’ skill level.
- Place one cone along the end line, 5-8 yards outside of each goal. There should be no cones along the end line between the two goals.
- Divide the players into two teams and assign each team to form a line behind the cones setup to the outsides of the goal.
- Each player should have a ball. If there are not enough soccer balls for each player, make sure the players at the front of the line have soccer balls.
Instructions:
- On the coach’s signal, the first player in each line starts dribbling as fast as possible towards their cone in front of their goal.
- The players dribble around their cones and then shoot on goal, attempting to score before their opponent.
- Players are free to shoot as soon, or as late, as they want after dribbling around their cone. Players can shoot from distance or dribble closer to the goal for an easier finish.
- The player who scores first is awarded two points for their team. If a player scores, but does not score before their opponent, then they are awarded one point for their team. No points are awarded to teams is players do not score.
- After the first two players complete their turn, they retrieve their soccer balls and go to the back of their team lines.
- The next players in each line prepare to repeat the process on the coach’s signal.
- After each player has competed once, tally up the team score and declare a winner for the round. Have the teams gather any extra soccer balls and then have the teams switch goals. Repeat for as many rounds as needed.
Variations:
Add cones – Add more cones, or obstacles, that players must dribble around before shooting. This will increase their ball control and make the game more difficult.
Vary the distance – Increase, or decrease, the distance the players must dribble before turning around and shooting.
Individual point system – Players keep track of their own points. Players must rotate opponents and compete against each other to see who has the most points after 6-10 turns. The player with the most points wins.
Coaching Points:
- Challenge the players to dribble and compete at full speed. Players should push themselves to dribble quickly and shoot at the right opportunity.
- If players are new to shooting, or struggling to consistently finish, remind the players of the shooting techniques. Players should lock their ankle and have a strong plant foot next to the ball before swinging, smoothly through the ball.
- Teach the players to take a quick look at the goal before striking the ball to know where the goalkeeper is and to increase their chances of deciding the best spot to finish the ball.
- Players should focus on finding the right balance between accuracy and power. Accuracy should be emphasized over power.
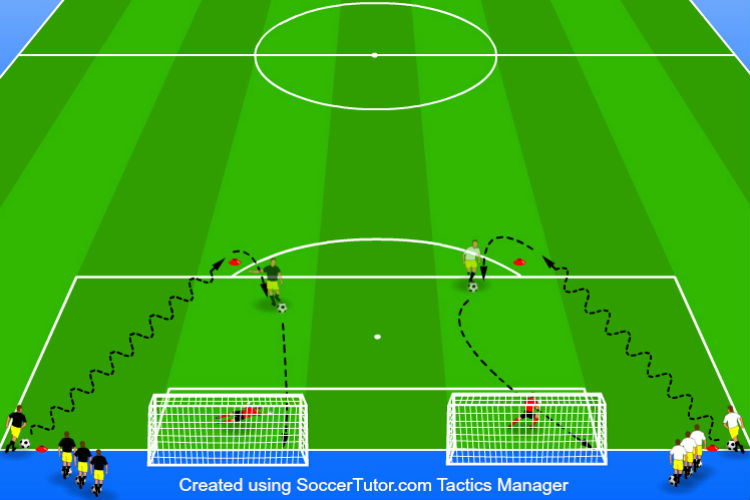
8. Gate Shooting
How the Drill Works:
A player crosses a ball in front the goal for the goalkeeper to catch who then rolls the ball towards the gate of cones at the edge of the penalty area. The same player who crossed the ball runs around the top of the gate to receive and shoot the ball that the goalkeeper rolled out.
Purpose:
Develops crossing, receiving, and shooting skills for field players. Goalkeepers also get to improve their ability to catch crosses and distribute the ball.
Setup:
- One full size goal is needed for this activity.
- At least one goalkeeper is needed. If there are extra goalkeepers, have them stand on the side of the goal and rotate in every 3-5 repetitions.
- Set up a gate using two cones, about 7-10 yards wide, just inside the penalty box, or 12-16 yards out from the goal.
- Place one cone on each side of the goal along the end line. Each cone should be 15-25 yards away from the goal. Adjust the distance according to the players’ age and skill level.
- Divide the players evenly between the two cones positioned along the end line and have the players form a line behind each cone.
- Divide all the soccer balls evenly between the two lines.
Instructions:
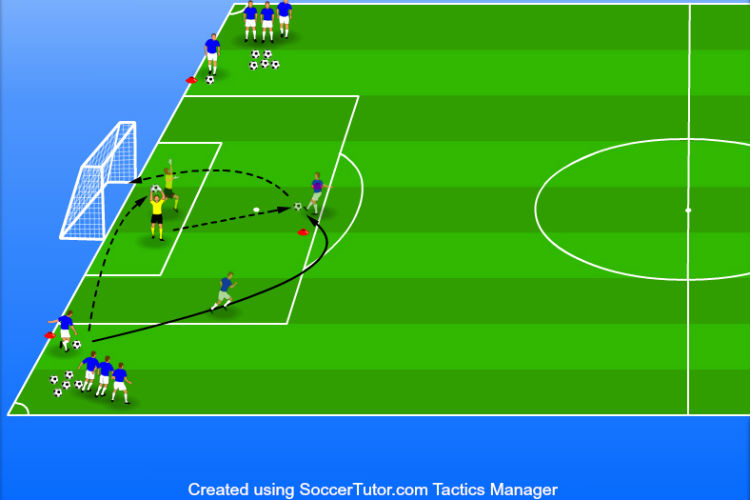
- One player from the front of a line begins the drill by crossing the ball to the front of the goal for the goalkeeper to catch.
- Once the player crosses the ball they begin running towards the cone gate while the goalkeeper catches the ball and rolls the ball, on the ground, towards the cone gate.
- The player runs around and through the gate to receive the ball and shoot.
- As soon as the player has finished their turn, and the goalkeeper is ready, the player from the opposite crossing line can begin their turn.
- After each player shoots, they must retrieve their ball and go to the back of the opposite line they came from.
- Continue this process for 3-5 minutes. Repeat as many rounds as needed.
Variations:
One-touch – Players must finish with one-touch.
Change the crossing angle – Move the side cones up the field, away from the end line, so that crosses are served from different angles.
Goalkeepers give a bouncing ball – Goalkeepers bounce, or toss, the soccer ball towards the gate after catching the cross. Shooting players must control the ball out of the air and finish quickly.
Coaching Points:
- Elevate to the tempo of the drill by demanding the next cross be served as quickly as possible. This will increase the concentration among players and give players more repetitions.
- Teach the players to focus on accuracy and weight of their crosses.
- Encourage players to have soft feet and to concentrate on their first touch. A quality first touch will give players a better chance of scoring.
- Remind players to look up at where the goalkeeper is positioned before looking back down at the ball to shoot. Players should focus on placing the ball around the goalkeeper when they are this close to the goal. Accuracy over power should be stressed in this situation.
- Challenge the goalkeepers to come meet the cross quickly and jump up to catch the ball. Goalkeepers should work on clean catches and being in control of the ball as soon as they catch it.
9. Moving Goal
How the Drill Works:
Two players take the ends of a rope, pole, or flag, and stretch it out to create a moving goal. The two players constantly move around the field, or playing area, while the remaining players divide into two teams and attempt to score as many goals as possible on the moving goal.
Purpose:
Fun activity suitable for young players just learning to pass and shoot. Can be used as a good warmup activity for older players. Players develop their passing and shooting accuracy skills in this drill. Players must have good vision and teamwork to score as many goals as possible.
Setup:
- Decide on a playing area depending on the number of players and the skill level. Half-field is suitable for 20-28 players. Use that to judge the space needed.
- Select two players who will start the drill as the “moving goal.” Give the two players a rope, pole, or flag to hold in their hands to form the goal. The space between the two players and below the rope is the goal area.
- Divide the rest of the team into two, evenly numbered teams and assign each team to a jersey color.
- One soccer ball per team is needed.
Instructions:
- To start, the two players acting as the “moving goal” begin jogging around the field together. The two players must communicate and stay together to maintain the distance between themselves, creating the goal. These two players constantly move around the field for the remainder of the round.
- The two teams pass and dribble their soccer balls to set themselves up for the best chance at scoring on the moving goal.
- As soon as the ball successfully goes through the two players, and below the rope, the team immediately continues passing and moving attempting to score again, and again.
- Each goal is scored, that team earns one point. Teams must keep track of their own points. The team with the most points after 1-3 minutes is the winner of that round.
- After each round, take a short break and switch the players acting as the moving goal.
- Repeat for as many rounds as needed.
Variations:
More goals – Add more moving goals to increase the number of shooting chances. Have two, three, or four goals depending on the number of players and the field size.
More soccer balls – Give each team two, or three, soccer balls. This will increase scoring chances as well as raise players’ awareness level.
One soccer ball – Play with only one soccer ball. Teams must compete for possession of the ball and use possession to setup scoring opportunities.
Coaching Points:
- Stress to players that they must work together to move the ball to score the most goals as a team. Players are encouraged to dribble and pass to each other to setup up one another in good scoring positions.
- Remind the players to shoot low and to use some caution when shooting on their teammates acting as the moving goal. The players acting as the moving goal should protect themselves from hard shots.
- Challenge the players to score as many goals as possible each round. Encourage the players acting as the moving goal to make it difficult for the teams to score.
- Teach the players to lock their ankle when shooting and to keep their chest over the ball when striking through to keep their shots low.
10. Power and Finesse
How the Drill Works:
Players form a line outside the penalty area while two players are designated as passers and position themselves on each side of the full-sized goal. One player at time a time will take a distance shot off their dribble, mid-range shot from a passer, and a final close range shot from the other passer.
Purpose:
Develops a player’s ability to finish at various distances. Players improve on their different shooting techniques and accuracy in a quick repetition activity.
Setup:
- Setup a full-size goal at one end of the field.
- One goalkeeper is needed in goal. If there are extra goalkeepers, position them outside of the goal and have them rotate in every 2-3 turns.
- Two players start as designated passers and position themselves on each side of the goal, about 3-5 yards off each goal post. Designate one passer as the mid-range passer and the other as the short-range passer.
- Set up a cone about 5-8 yards outside of the penalty box.
- The rest of the players form a line behind the cone set up outside of the penalty box.
- The soccer balls should be divided up evenly between the player line and the two passers.
- The first player in line starts with a ball at their feet.
Instructions:
- The first player in line takes a touch towards goal and then shoots the ball from outside the penalty area.
- Immediately after the player takes their first shot, the mid-range passer completes a pass to the penalty area for the shooter to run on to and finish in one touch.
- Immediately after the second shot, the short-range passer completes a pass to the six-yard box for the shooter to run on to and finish in one touch.
- Once the shooter has completed all three shots, the shooter retrieves any soccer balls that went behind the goal while the goalkeeper retrieves any balls that are in the goal. The shooter then returns to the back of the line.
- Once the goalkeeper is set the next player in line can begin their turn.
- Once each player has gone through twice, rotate the designated passers, and collect any extra soccer balls.
- Continue for as many rounds as needed.
Variations:
Switch sides – Switch the sides of the short and mid-range passers so that players work on finishing from both angles.
Passer angles – Change up where the designated passers are positioned. Bring them off the end line and have them give passes from the sides of the box. This will force players to finish square passes rather than passes that are coming back to them.
Volleys and headers – Passers hand-toss balls in the air to the shooter. Shooters must decide if they are going to strike the ball out of the air with their foot, or head the ball. Shooters only get one touch still.
Vary the distance – Increase or decrease the distance depending on the players’ age and skill level.
Coaching Points:
- Encourage the players to shoot off the first touch every time, if possible.
- Educate the players on various shooting techniques. Their first shot from distance will probably need to be struck with their laces and more power. The mid and short-range shots are good opportunities for players to use the inside of their feet to redirect the ball and focus on accuracy to beat the goalkeeper.
- Players should take a quick glance up before shooting to see where the goalkeeper is positioned in front of the goal. This will allow players to make a better decision on the type of technique they should use to finish.
- Players should focus on keeping their eye on the ball when going to shoot. Their plant foot should be positioned next to the ball and a smooth swing with a locked ankle should strike through the ball.
- Remind players that since they are running on to the ball, they do not need such a powerful foot swing, but rather a clean smooth motion to redirect the ball into the goal. The players forward momentum will provide most of the power needed to finish the ball.
- Stress to the players to maintain a locked ankle position when striking the ball. This will ensure a more accurate shot and better finishing consistency.
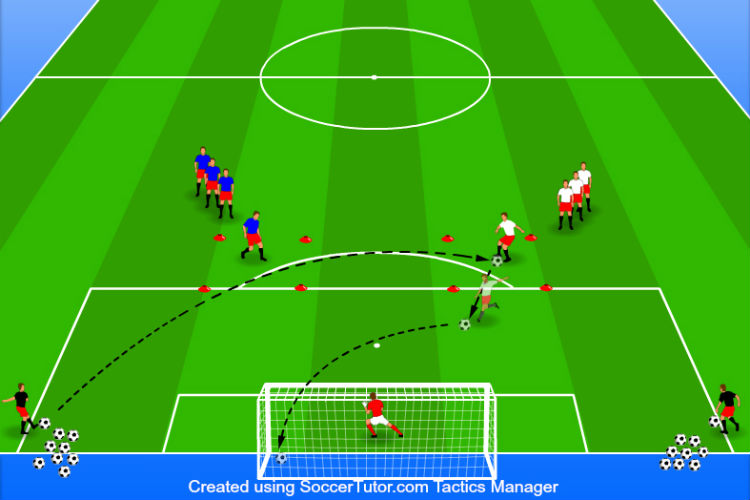
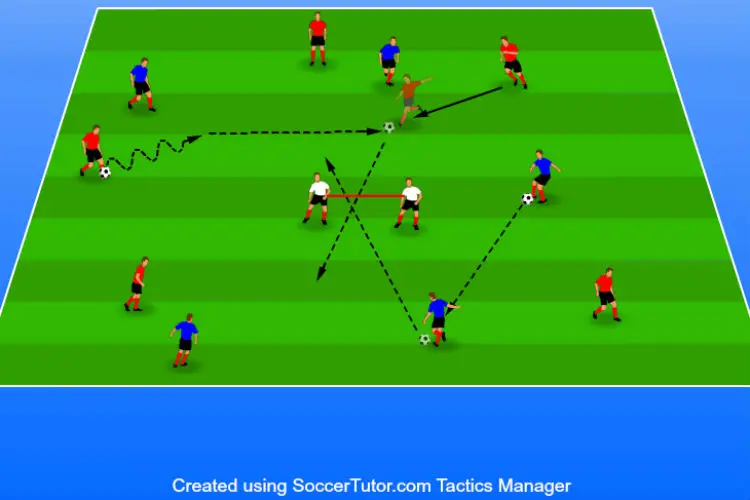
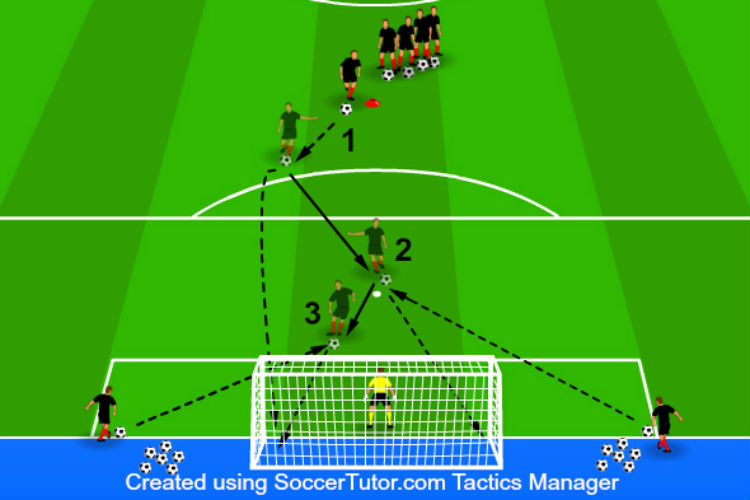
11. Quick Finish Competition
How the Drill Works:
Two teams compete to score the most goals in a round. There is one team on defense and one team on offense each round. The defending team passes the ball across the box before running at the offensive player receiving the pass. The offensive player takes their touch towards either goal, positioned on both sides of them, and attempts to finish on goal before the defender blocks their shot.
Purpose:
Develop players’ ability to take a directional first touch away from an approaching defender and score. Players increase the finishing skills with a defender attempting to block their shot. The activity allows for players to work on their fakes to create more separation from the approaching defender.
Setup:
- Two full-size goals are needed for this activity. Setup the goals to face each other with 30-35 yards of space between them.
- Assign one goalkeeper to each goal. If there are more than two goalkeepers, have the extra goalkeepers rotate in every 3-5 repetitions.
- Setup a box of four cones in the center of the two goals. The box should be no closer than 10 yards from each goal and 12-18 yards wide. See diagram for better positioning details.
- On two, opposite sides of the cone box, form two cone gates. The gates will be setup on the two box sidelines that do not have a goal behind them. See diagram for more information.
- Divide the players into two, evenly numbered teams and assign each team a jersey color.
- Assign each team to form a line behind the cone gates setup across from each other. There should only be one team on each cone gate.
- Designate one team as the defensive team and place all the soccer balls behind their cone gate.
- The first player in each line steps up into their gate. Only the defensive player should have a ball.
Instructions:
- The first player in the defensive team line passes the ball directly across the square to the first player in the offensive team line.
- As soon as the defensive player passes the ball, they run across the square to try and win the ball from the offensive player receiving the pass.
- The offensive player receiving the pass must take their touch to the left, or right, away from the approaching defender and score on the goal that they take their touch towards.
- The offensive player must shoot inside the square and score to receive a point for their team.
- If the defender blocks, or steals the ball from the offensive player, then the offensive player’s turn is immediately over and the next two players compete.
- As soon as a goal is scored, or blocked, the next players in each line begin their turn while the players who just finished their turn return to the back of their team lines.
- Offensive players can score on either goal. They must stay within the box and can use as many, or as little touches to score. Offensive players should try to score in two, or three touches to keep the activity as game-like as possible.
- After each player on the offensive team has shot twice then the soccer balls are collected and teams switch roles and repeat the process. The team who scored the most points after each team has been on offense is declared the winner of that round.
- Repeat for as many rounds as needed.
Variations:
Two touches – Players must finish using only two touches.
Shooting Distance – Increase, or decrease, the distance from the edge of the box to the goal to vary the distance players must shoot from.
Box Size – To increase the first touch difficulty, decrease the size of the box. To allow players more time and space with their first touch, increase the size of the box.
Defenders can earn points – If a defender is able to steal the ball from the offensive player, and stay inside the box, the defender is free to score on either goal to earn their team a point.
Coaching Points:
- Teach the players about the importance of their first touch. The players’ first touch should take them away from the approaching defender and allow them to finish on their second touch. The box is used to keep the offensive players’ first touch honest and game like.
- Challenge the defenders to run down the offensive player and attempt to win the ball from them.
- Encourage the offensive players to keep their head up to see where the defender is and what kind of touch is needed. Players should use little fakes, or body position adjustments to trick the approaching defender and create more space for themselves.
- Remind the players to see where the goalkeeper is at and finish the ball in the back of the net as often as possible. Players should use various finishing techniques to beat the goalkeeper and find which technique works best for them.
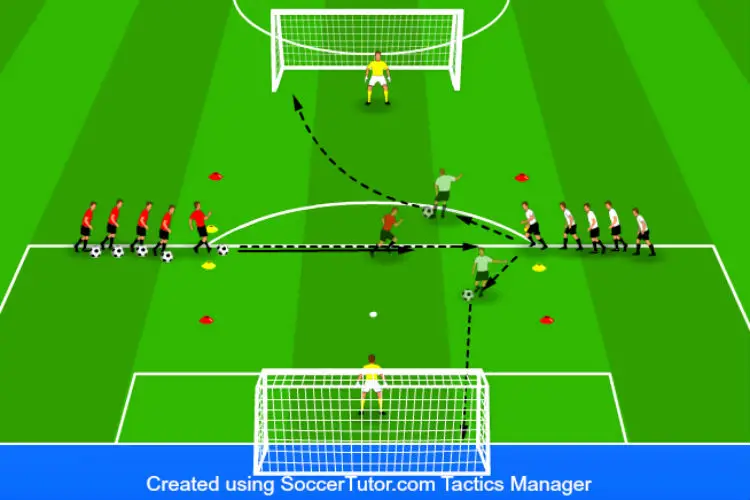
12. Sequence Shooting
How the Drill Works:
Players complete an up, back, and through passing pattern before finishing on a full-size goal.
Purpose:
Develop a player’s ability to score from a pass that is played in front of them. Players increase their ability to play a ball into a moving player’s path.
Setup:
- One full-size goal should be setup at one end of the field.
- One goalkeeper is needed. If there are extra goalkeepers, have them stand off to the side of the goal and rotate in every 3-5 repetitions.
- Setup six cones around the edge of the penalty box as the diagram below shows. The three blue cones work together while the three red cones work together.
- Divide the players into two groups of 6-8 players. If there are more than 8 players per group, set up another goal and cones.
- Assign one group to the blue cones, and the other group to the red. Have the players form lines behind their respective colored cones, furthest away from the goal.
- Have two players from each group stand on the other two, colored cones.
- All the balls should be divided between the two lines of players.
- The two players from each group that are not in the line, should not have a ball. The first player in each line should have a soccer ball.
Instructions:
- To start, the first player in one of the group’s passes forward to the player standing on the cone in front of them. The first player is the shooter and will end back up with the ball.
- The player on the first cone receives the pass with their back to goal and then passes the ball to the other player standing on the third cone.
- The third player receives the pass and then passes it in front of the first player who has begun to run towards the goal. The pass should be in front of the running player and into their path.
- The first player attempts to score in one, or two touches.
- As soon as the first group has finished their turn, the group of players on the other three cones begins their turn. The groups rotate turns back and forth.
- After a player shoots, the shooter becomes the player who passes the ball back, the player who passes the ball back becomes the player who passes the ball forward, and the player who passes the ball forward retrieves the shooter’s shot and then returns to the back of their line.
- This rotation of players and groups continues for 5-7 minutes before resting, retrieving any extra soccer balls, and then switching cones so that both groups can finish from both sides.
- Repeat for as many rounds as needed.
Variations:
Distance – Increase, or decrease, the distance between the cones and goal depending on the length of passes players should complete and the distance players should finish from.
One-touch – Complete the passing and finishing using only one-touch.
Coaching Points:
- Challenge the players to keep all passes on the floor and to pay attention to the weight of their passes. The final pass to the shooter should be just far enough in front of the player that they can shoot on one-touch if they would like. The final through pass is the most important to give the shooter the best chance of scoring.
- Teach the players the timing of the run from the shooter. The shooter should time their run so that they are beginning their run to goal just before the final passer is about to pass the ball. The runner should be close to full speed to make the run as game-like as possible.
- Remind the players to pick their head up before looking back down to strike the ball to see where the goalkeeper is at. Players should pick out the open area of the goal and place the ball around the goalkeeper and into the back of the net.
- Depending on the shooting distance, players should mainly the inside of their feet to finish in this activity. Players should look to curl the ball around the goalkeeper when they are inside the penalty box and running free to goal. If the activity is changed to be further away from goal, players might need to use their laces to finish with enough power.
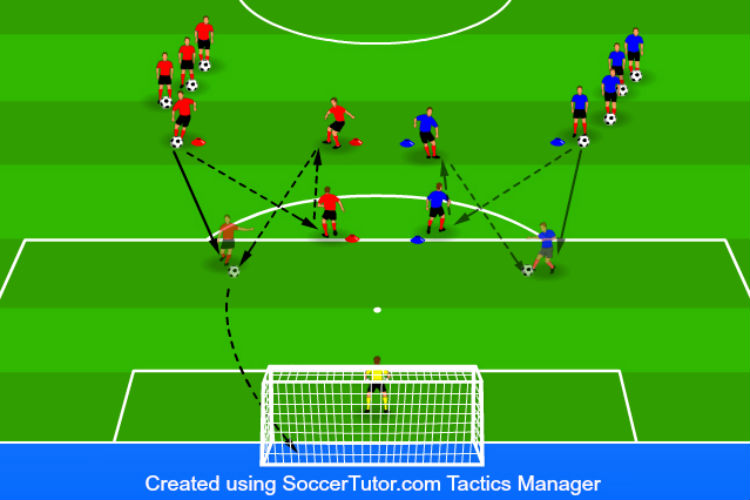
13. Team Sniper
How the Drill Works:
Teams compete to finish and score as many crossed in soccer balls. Teams must stay inside the designated area as balls are crosses in from one side at a time.
Purpose:
Competitive drill that works on finishing on goal from crosses. Players must compete to get to the ball first and score from their team. Drill allows for many repetitions and a game-like scenario.
Setup:
- Divide the players into three teams. Each team should have at least 3 players, and no more than 5 players. Give each team matching jerseys.
- Use the penalty box as the designated area that the teams must stay inside to finish on goal. If needed, or wanted, create a smaller box inside the penalty box using cones. A smaller area will force crosses to be more accurate and finishing players to work in a more crowded area.
- If there are enough players for 6 teams, create the same setup using a different goal.
- Two teams start the drill inside the designated area.
- The third team starts as the crossers. At least one crosser will be needed on each wing of the activity. If there are multiple crossers, then those players alternate services.
- All the soccer balls should be divided up evenly between the two crossers, or lines of crossers.
- If there are goalkeepers present, then place one goalkeeper in goal. Extra goalkeepers should stand off to the side of the goal and rotate in every 3-5 repetitions.
Instructions:
- To start the activity, one crosser passes, or crosses, a soccer ball into the designated area where the two teams are inside.
- The players inside the designated area, from both teams, attempt to get to the ball first and score. Players shoot as quickly as possible while staying inside the designated area.
- After the first ball is scored, or goes out of the designated area, the crosser from the other side serves a ball into the designated area and continues the process.
- Each team keeps count of their goals scored. The team with the most goals at the end of round wins. Only goals scored within the designated area count.
- Play each round for 3-5 minutes, or until there are no more soccer balls to use.
- After each round, one team goes out to be the ball servers, and the team that just served comes into the designated area.
- Play as many round as needed.
Variations:
Limit touches – Have the players use one or two touches at most to finish.
Must finish out-of-the-air – Goals are only counted if players can score the ball out-of-the-air. The services must be in the air and players must battle to win headers and volleys in order to score.
Coaching Points:
- Challenge to players to compete at a high tempo. Demand that crosses be served as soon as the previous ball is over. Demand that players keep a game-like tempo and finish as quickly as possible.
- Remind the players to focus on finishing the ball. Players should focus on accuracy and the right time to use power. Players should keep their eye on the ball and to be strong when they go into finish the ball.
- Teach the players to take the ball away from the opposition with their first touch if they are unable to finish off the first touch.
- Encourage the players to compete and to score as many goals as possible each round. Players should constantly be trying to get on the end of the service and move into good spots to finish.
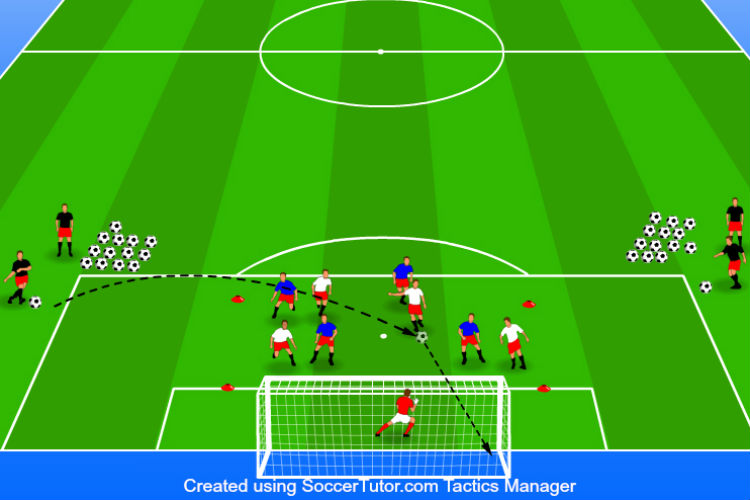
14. Turn and Shoot
How the Drill Works:
Three small squares are setup outside the penalty area. Players must receive and turn with the ball inside the square before shooting on goal.
Purpose:
Develops shooting skills after players turn with the ball. Players improve on decreasing the time it takes for them to turn and finish on goal. Players increase their first touch quality and finishing skills through many quick repetitions in this activity.
Setup:
- A full-size goal is needed.
- Use cones to mark three, separate square boxes at the top of the penalty area. The squares should be 3-5 yards wide. All three boxes should be along the penalty box with each square being 6-8 yards away from each other. Increase or decrease the distance the boxes are from the goal and each other depending on the players’ age and skill level.
- Divide the team into three, evenly numbers groups.
- Assign each group to form a line behind the three boxes setup. Each line should start 5-8 yards behind the box.
- Divide all the soccer balls evenly between the three lines of players.
- The first player in each line steps into the square without a ball.
- The next player in line starts with a ball at their feet.
- If goalkeepers are available, position them in the goal. If more than one goalkeeper is available, have them stand to the side of the goal and rotate in every 3-5 repetitions.
Instructions:

- To start, the square to the left of the goal, when facing the goal, goes first. The player inside that square calls for a pass from the player at the front of their line. The player at the front of the line passes the ball to the player in the square.
- The player inside the square receives the pass, turns with the ball, and shoots on goal all while attempting to stay inside the square.
- As soon as that player has completed their turn, the player that passed them the ball steps into the square while the player in the middle square begins their turn.
- After the player in the middle receives, turns, and shoots, the player in the right square begins their turn. Once the right square has completed their shot, the process starts back over at the left square.
- Players must retrieve their ball after each turn before returning to the back of their line. Players stay at the same square box for the duration of the round.
- Each round should consist of at least 2-3 shots per player. After each round, gather and reset all the soccer balls and shift each group of players one box to their right. Repeat this process for at least three rounds so that players take shots at each square.
Variations:
Two-touch limit – Players only get two touches to turn and shoot the ball.
One defender – Add a defender inside the box. Start with the defender going easy and slowly work up to the defender working at full speed.
Pass in the air – Passes are hand-tossed in the air to the shooters in the boxes. Players in the box must take the ball out of the air and finish in the least amount of touches.
Coaching Points:
- Stress the importance of a quality first touch. The better the player’s first touch, the better chance they give themselves to score.
- Encourage the players to receive, turn, and shoot as quickly as possible to mimic game speeds.
- Instruct the players to focus on accuracy when shooting the ball. Players are encouraged to use power to strike the ball, but make sure they are still attempting to increase their accuracy.
Want Even More Soccer Drills?
Before you go, make sure to check out our pillar post that includes 123 completely free soccer drills that you can print off and use at practice.