7v7 Soccer Formations (7 Great Options to Choose From)
A common feature of youth soccer, 7v7 matches are a great way to hone players' skills and understanding of the beautiful game.
Besides giving them more touches of the ball, the smaller space enables players to improve their technique, dribbling skills, and ball control as well as start developing a sense of positioning out on the pitch.
7v7 represents an important step up from 5v5 matches and helps youth players develop the necessary skills and knowledge to progress on to 9v9 and then 11v11 matches.
Formations obviously play a key role in this development with some focusing on being solid and defensive and others being more free and attack-minded.
Let's take a look at some things to take into consideration when choosing your line up before looking at some of the best and most common 7v7 soccer formations.
Considerations When Choosing a Line-Up
While each coach has their own soccer philosophy and preference of playing style, there are a number of factors to take into consideration when choosing how your team will line up.
For instance, there’s no point persisting with a certain formation if you just don't have the right players for it.
Likewise, if your team is dominant in the league and steamrolling opponents each and every match, it’s well worth changing things up from time to time as this will aid with their development.
This could be by giving more minutes to more players or challenging them by playing them in different positions and formations.
As 7v7 is primarily used by youth teams using smaller field dimensions, at this early stage of their development, the important thing is to get them learning, progressing, and enjoying their soccer.
As such, here are some factors to take into consideration when choosing the perfect 7v7 formation.
1. Personnel
With any formation, you really want to play to your players' strengths.
This could mean selecting a more attacking formation if you have attack-minded players or a defensive one if you are short on forwards.
2. Balance
Having said that, you still want the formation to be balanced and have no obvious weaknesses or gaps for the opposition to exploit.
This means having enough players in both attack and defence as well as on each flank.
3. Your Opponent
If the opposition team is renowned for their attacking prowess, it may be worth selecting a more compact and defensive formation to help deal with their forwards.
While it may feel like an afront, adapting and tailoring your tactics to your opponent, it can be a good excuse to teach your players how to line up and play in a different style.
4. Opportunities and Minutes for All
While teams will often have a few standout players or stars, youth soccer is all about helping players progress and improve.
This means giving weaker players just as many minutes on the pitch.
5. Practice Formations
In training sessions, it’s well worth trying out various formations to see what works for your players.
While this will also help improve their positioning and understanding of the game, it may help you to stumble across a great formation you hadn't previously considered viable.
As every coach knows, there’s no one perfect formation; it really depends on your team and players.
Consequently, it’s worth experimenting with some of the following formations to see what suits your players and what helps them best to develop and further their understanding of the game.
The Best 7v7 Soccer Formations
With 7v7, there are almost as many formations out there than there are for an 11v11 match.
While some of them are more compact and defence-minded, others allow the forwards much more attacking freedom.
Let's take a look at the most common 7v7 soccer formations as well as their pros and cons to see which would best suit your team.
2-3-1 Formation
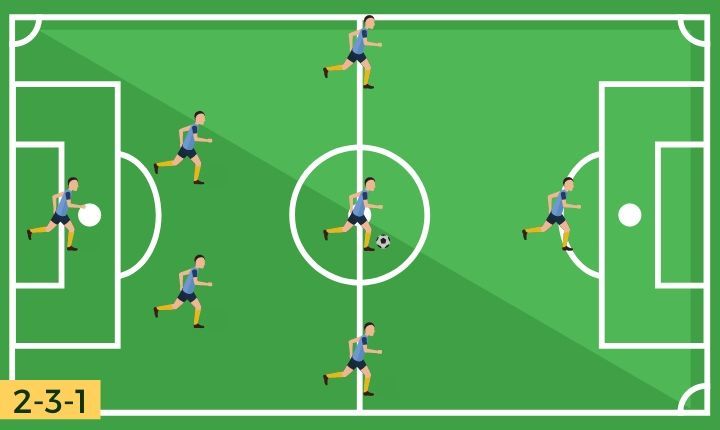
The most popular and commonly used 7v7 formation, the 2-3-1 has everything you could want from a line-up.
The two defenders offer stability at the back while the striker up front is supported in attack by the three midfielders who are also expected to track back and help out with the defence.
Beautifully balanced, the 2-3-1 covers most areas of the pitch and this means that there’s a lot of depth and width in which the players can operate.
Due to its straight forward nature, the formation is very easy for young players to grasp and so they should have no problem at all with positioning.
Pros:
- Very balanced formation with players spread out all over the pitch
- Easy for the players to understand as each position has its own role
- With this formation, the team should be solid at the back, dangerous up front, and be able to control possession
Cons:
- The midfielders have to work hard and run all the time
- The centre of the pitch can get a bit too crowded if the midfielders stay too narrow and shut down each other's space and passing angles
- If the defenders stay too wide then gaps can open up at the back
2-1-2-1 Formation
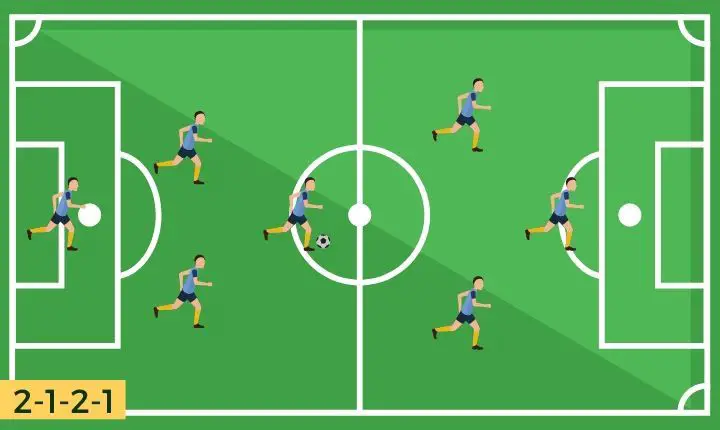
While it’s very similar to the 2-3-1, the 2-1-2-1 actually offers teams both more defensive stability and greater attacking prowess.
This is because the defensive or deep-lying midfielder frees up the other two midfielders to stay higher up the pitch, closer to the striker.
This essentially splits the team in two with the front three assigned attacking roles and the back three being on defensive duty.
This makes the formation easy for youth players to understand.
It does however run the risk of being slightly disjointed if the two more attacking midfielders don't track back and the defensive midfielder doesn't push forward.
Pros:
- Very clear for the players whether they should primarily be a defensive or attacking player
- The team will be solid at the back and bag lots of goals up front
- The attacking players have quite a lot of freedom in which to express themselves
Cons:
- If the midfielders don't work well together as a three, then it could almost feel like the team is divided in two with one set of players attacking and the other defending
- Too much space can develop between the attacking and defending players
- You need a disciplined, defensive-minded player who’s good on the ball to play the system
3-1-2 Formation
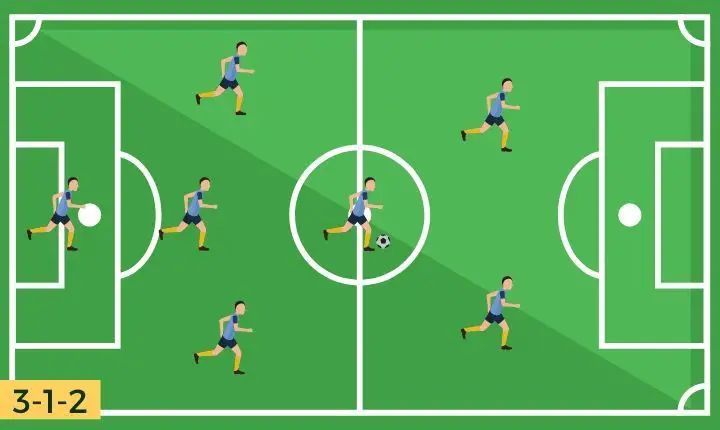
If you’re looking to play an even more defensive-minded formation but still not lose your attacking output, then the 3-1-2 may just be for you.
This of course requires you to have a number of good defenders and attackers on the team as well as a very hard-working central midfielder or two!
While it may look like the midfield will get overrun and that the team will lack width, the formation actually offers players plenty of freedom.
This is because the defenders and strikers are called upon to be very flexible and fluid, pulling out wide and dropping back or pushing forward when they see fit.
In this way, the 3-1-2 helps them better understand all the different requirements of their position and how they can best help the team succeed.
Pros:
- The team is very hard to score against
- Strikers learn to both defend and attack from the front and work as a pair
- Teaches players about positioning, hard work, and teamwork
Cons:
- It can be too defensive and have no width if the fullbacks don't push forward
- The central midfielder has to run a lot and work very hard
- The formation loses a lot of its potential if the defenders and strikers aren't fluid and flexible in the positions they take up
3-2-1 Formation
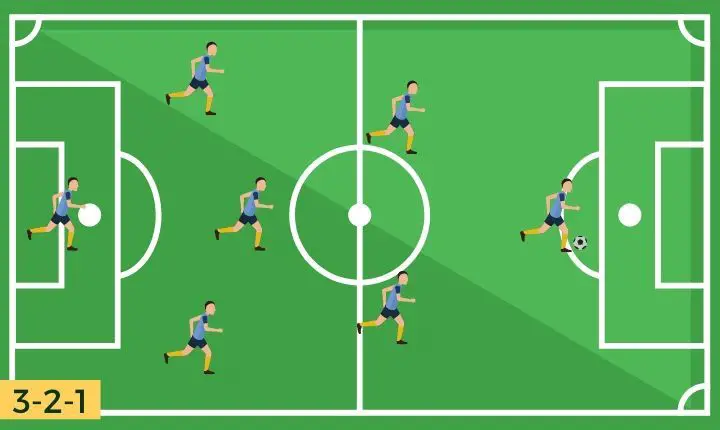
Another alternative is to play the 3-2-1 or Christmas Tree formation.
While this is quite defensive, it gives the team more stability in the centre of the pitch and doesn't require as much tactical flexibility and fluidity from the players.
This then enables you to be solid at the back, control the centre of the midfield and still offer an attacking threat through the striker.
In this formation, it’s important that the central defender is comfortable on the ball so that they can step forward and push up into midfield from time to time.
This can, however, make it confusing for the two midfielders who are expected to both give the team width and make sure that the centre isn't left too open.
Pros:
- Very hard to score against with three defenders at the back and two midfielders in front of them
- The team can control possession and dominate the centre of the park
- Players don't need to be as skilful or quick as with other formations
Cons:
- The formation can be a bit too defensive if the striker is left isolated up front
- There may be a lack of width if the two midfielders don't push wide
- The formation can confuse players as the central defender is expected to push forward and the two midfielders are meant to cover the centre and flanks of the pitch
3-1-1-1 Formation
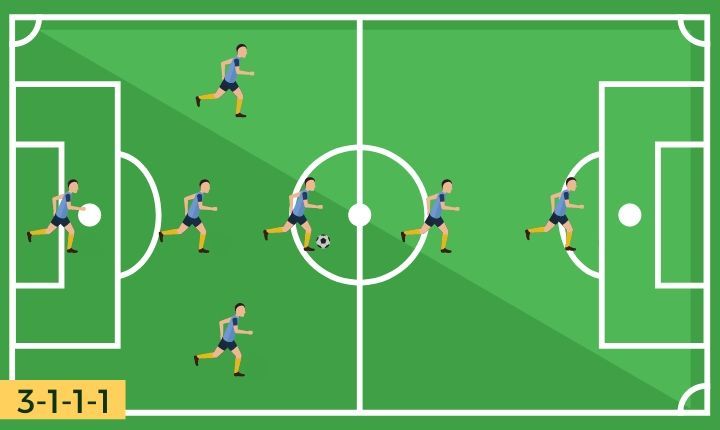
Another version of this is the 3-1-1-1.
This formation, however, relies heavily on you having the right players to play the system.
This is because you ideally need two fullbacks who are happy to push on, an attacking midfielder who can float around the pitch, and a defensive player who can sit in behind them.
While the formation should again be quite hard to score against, the worry is that you’ll be overrun on the flanks and not have enough passing angles for you to keep possession.
But it’s well worth experimenting with if you don't have any wide midfielders and think it’d suit the rest of your players.
Pros:
- Solid at the back with three defenders and a defensive midfielder
- If you have the right personnel, it can really help each player's unique talent shine
- Accommodates both an attacking midfielder and striker into the line-up
Cons:
- Can be very narrow as it relies on the fullbacks pushing forward
- Can be hard to keep possession if players don't create passing angles, make runs, or push out wide
- The team can struggle to fashion chances if the attacking midfielder and striker don't work well together
2-2-2 Formation
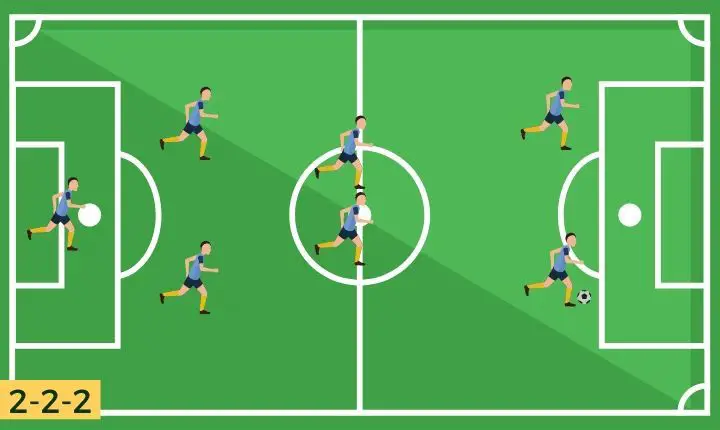
Although on paper it looks perfectly balanced between defence, midfield, and attack, the 2-2-2 hasn't caught on for some reason and isn't all that commonly used.
It can, however, be a great formation to use provided you have the right players and give the right instructions.
While it’s solid at the back and has two strikers up front who can weigh in with goals, the formation does risk being a bit narrow if the midfielders or strikers don't push out wide.
This can also lead to the team struggling to control possession if players aren't flexible in the positions they take up and create more passing angles.
Pros:
- The team is solid at the back with attacking options up front
- Strikers learn how to work as a pair and how to drop wide and create chances
- Each position has a clear role which makes it easier for younger players to understand exactly what’s expected of them
Cons:
- The team can get overrun on the flanks
- The formation relies on both the midfielders and strikers pushing out wide to create passing angles, width, and space
- It can be hard to keep possession if no one pushes wide
1-1-3-1 Formation
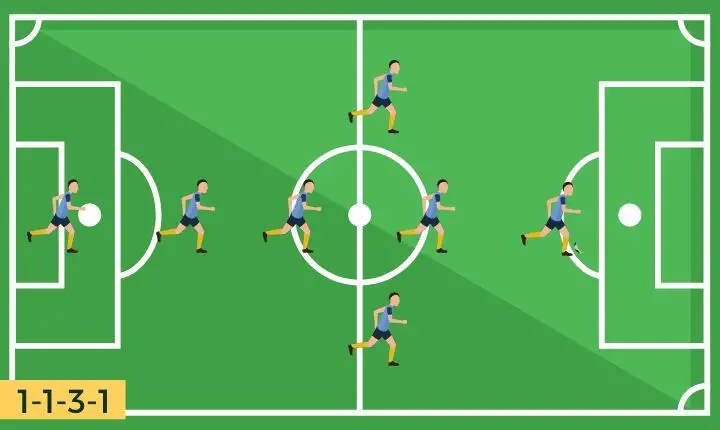
Another formation that isn't all that popular but can be great with the right players, the 1-1-3-1 is a very dangerous and attack-minded line-up for any team to face.
It does, however, have the obvious flaw of being very open and exposed at the back.
As such, you really need a monster defender and defensive midfielder to play this formation as well as hard-working midfielders who don't mind tracking back.
This then gives you some semblance of balance and helps you create lots of chances up front without conceding too many at the back.
Pros:
- You can feature lots of attack-minded players in the line-up
- The formation can be very flexible and dynamic provided that the midfielders cover enough ground
- The defensive midfielder helps the defender and allows the other three midfielders and striker to attack with abandon
Cons:
- You'll struggle to play this formation unless you have an amazing defender and a great defensive midfielder
- The team can easily get overwhelmed and overrun at the back
- The formation relies on the three midfielders working very hard and supporting the team out at the back
Conclusion:
Well, there you have it.
A big list of the best 7v7 soccer formations.
All the formations you need to get your team playing everything from free-flowing attack-minded soccer to grinding out a draw against a top team.
While some of these formations give you defensive solidity at the back, others allow you to accommodate more attackers and wide players into the line-up.
There’s no single perfect formation for every occasion so it depends on the players you have at your disposal, how attacking or defensive you want to be, and the opposition you’re facing.
It’s well worth trying out a few of these different 7v7 formations over the season to see which best suits your team and keeps them progressing and improving as soccer players.
When your players move up to the next age group, make sure to check out both my 8v8 formations article and my 9v9 formations article!

