
")
11 Soccer Tryout Drills (2024 Update)
Planning and running soccer tryouts is a challenging task for even the most experienced soccer coaches.
Coaches will often only have one or two sessions with the new group of players trying out before selecting the team.
That's why it's incredibly important to have effective soccer tryout drills that will allow you to evaluate the skills and abilities of all players trying out in a short amount of time.
Below are some of the best soccer tryout drills I've found to use at any level.
11 Soccer Tryout Drills
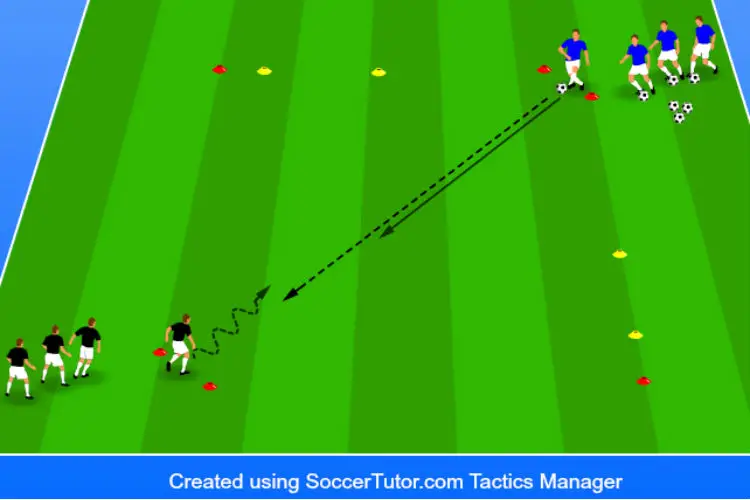
1. 1-on-1 Defending
How the Drill Works:
Players compete in a 1-on-1 game to gates to test their attacking and defending skills.
Purpose:
Evaluate players’ ability to defend attackers in open space. Players are asked to close down space quickly and then keep the attackers from getting past them. Players are able to showcase their attacking and defending skills.
Setup:
- See diagram below to follow along more easily.
- Mark a square 20x20 yards with cones. On opposite corners, make a gate with two cones. The other two corners will have just a single cone.
- Pick a corner with a gate, on each side of the gate, along the sideline, position a different colored gate 10-12 yards away. These will be the scoring gates and should be 3-4 yards wide.
- Divide the players into two groups. Have one group start as the defenders behind the gate that is positioned closest to the scoring gates. The second group will start as the attackers and will start behind the corner gate opposite the defenders.
- All of the balls start with the defenders.
- The first player in each line starts between their respective gate. The defender starts with the ball at their feet. The remaining players behind them should stand to the side of the gate.
- If there are more than 12 players in the exercise, make another setup so that players can receive more repetitions.
- Decide on the number of rounds and time limit for each round. Players should play as a defender at least twice for 4-5 minutes. Play more rounds and time as needed.
Instructions:
- The activity begins with the defender passing the soccer ball to the attacker on the opposite corner of the square. The pass should be on the ground and to the attacker’s feet.
- The attacker receives the pass as the defender runs forward to close down the attacker’s space.
- The attacker attempts to beat the defender and dribble through one of the three possible gates. The two gates to either side of the attacker are worth one point while the gate the defender started on is worth three points.
- The defender attempts to prevent the attacker from scoring on any of the three gates. The defender can score their own points by winning the ball from the attacker and dribbling through the attacker’s starting gate.
- If the ball goes out-of-bounds at any point, for any reason, the turn is over and neither player has scored points.
- The next turn can begin as soon as a player has scored, or the ball goes out-of-bounds. Players return to their original lines after their turn.
- Players keep track of their own points. The player with the most points after each round is announced the winner of the round!
- After each round, players should switch lines/roles so they can showcase both their offensive and defensive abilities.
- Make sure the players resting do not stand in the way of any gate as players will be attempting to dribble through them at high speeds and could cause collisions.
- Play enough rounds that each player defends for at least two rounds. Defending is the main focus in this activity.
Variations:
Size – Change the dimensions of the activity to fit the quality and athleticism of the players. If the dimensions are too easy for the attackers or defenders, adjust accordingly.
Coaching Points:
- Teach the defenders to close down the attacker’s space as quickly as they can and then arrive on balance.
- Remind the attackers to be creative and decisive with their changes of direction!
- Educate the defenders to bend their knees and time their tackles so they are not caught reaching for the ball.
- Challenge the defenders to win the ball every time and score points on the attackers!
- Encourage the attackers to use fakes, change of speed, and moves to get past the defenders and score!
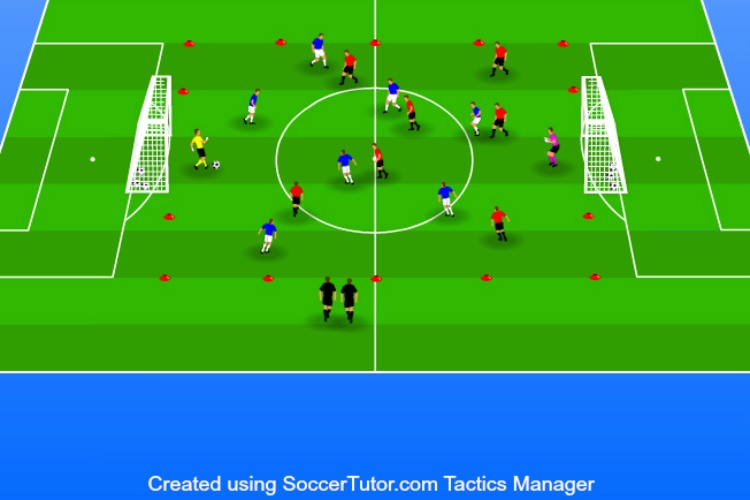
2. 8-on-8 Game
How the Drill Works:
Two teams of eight, including a goalkeeper for each team, play 8v8 to goals. With a smaller field and less players, players will get more touches and action for coaches to evaluate them.
Purpose:
Create a smaller field with less players for coaches to evaluate players more quickly. Putting players on a small field keeps all of the players more involved and active in the game. Players are less likely to hide in this game setup.
Setup:
- Use the cones to mark a 70x45 yard field.
- Place one full sized goal on each end of the field.
- Assign one goalkeeper to each goal. If there are extra goalkeepers, have them rotate in every 3-5 minutes.
- Divide the field players into teams of seven and give each team a different colored jersey. Have two teams start on the field.
- Separate all the extra soccer balls between the two goals. One goalkeeper starts with a ball at their feet.
- Set the teams up in a formation to make sure there are enough defenders, midfielders, and forwards. Formations include (3-3-1, 2-3-2, or 3-2-2).
- Decide on the number of games and the time limit of each game. At least three games of 8-10 minutes with two minutes of rest is suggested.
Instructions:
- On the coach’s signal, the game is live and the goalkeeper with the ball is free to begin play.
- Players attempt to score on their opponents, defend their goal, and showcase themselves in front of the evaluating staff.
- If a ball goes out-of-bounds at any point, start a new ball with the keeper of the team the ball belongs to. Resume play.
- Play for the remainder of the round. Keep track of team scores. The team with the most goals scored at the end of each game is the winning team.
- Play three games of 8-10 minutes with at least two minutes of rest between each game.
Variations:
More than two teams – If there are more than two teams, rotate teams in after each game, or set up more fields. If there is only room for one field and there are more than four teams, shorten the game times to 4-5 minutes so that players are not standing for too long. This should also increase the intensity since the time spent working will be shorter.
Switch teams – Mix and match players as needed to evaluate. Have players switch teams after games to give the teams a different look if needed.
Coaching Points:
- Encourage the players to play simple and confidently. Players just need to be themselves to showcase their talents. Help them understand that so they do not try and do too much.
- Remind the players to enjoy the game and to pick their moments when going forward!
- Challenge the players to get to know each other since this will be the first time a lot of them are playing together. Learning each other’s names will be helpful!
- If there are more than two teams per field, keep the games moving to decrease the amount of time players are standing on the sideline.
- Increase the dimensions of the field as needed depending on the quality.
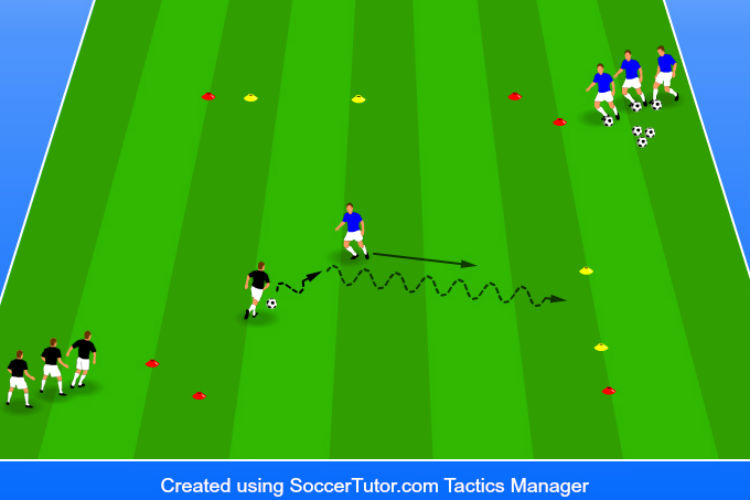
3. Agility Tryout
How the Drill Works:
Players sprint, shuffle, backpedal, and cut through a series of cones for coaches to evaluate their ability to cover ground and change directions quickly.
Purpose:
Evaluate players’ athletic abilities like speed, quickness, agility, and balance. Coaches can understand how players move and where they are in terms of athletic ability.
Setup:
- See diagram below for an easier understanding.
- Place a gate of cones, four yards wide, at the bottom of space.
- Place one cone 10 yards directly in front of the gate. On each side of the cone just placed, set one cone five yards away on each side.
- Place the final cone 20 yards directly in front of the gate.
- The final setup will have two cones on the bottom line, three cones in the next line, and then one cone at the top.
- Set up multiple courses depending on the number of players present. Try to keep each setup to eight players or less.
- Have the players form a line behind the gate of cones at the bottom.
- No soccer balls are needed.
- Decide on the number of runs each player will complete. It is suggested players complete 8-10 runs for the coaching staff to evaluate their athletic movement.
Instructions:
- The first player in line runs forward to the cone 10 yards away, shuffles to the left five yards, sprints right 10 yards, turns left and then sprints to the top cone.
- Players walk to the back of their line after completing their run.
- The next player in line starts their turn once the player in front of them completes their run. It is important players do not start until the player in front of them has finished as this is not a fitness drill and ample rest time needs to be given between runs.
- Once the first player is back to the front of the line, they complete the same pattern, but do the mirror image of the first run so they work on cutting on both feet.
- Change the pattern every 2-3 runs to evaluate players’ abilities to perform other athletic cuts.
- Players should complete 8-10 runs with an easy walk back to the beginning between each run.
Variations:
Add a ball – Have players perform the patterns using a soccer ball. Coaches will be able to evaluate some of the players’ and their dribbling abilities.
Patterns – Give a new pattern every 2-3 runs. Make sure players alternate running to both sides. Switching the patterns will allow coaches to evaluate more athletic movements and players’ abilities to work through each one.
Coaching Points:
- Teach the players to use their arms to run and cover ground.
- Remind the players to keep their cuts sharp and to stay close to the cones when changing directions. No rounding the turns!
- Challenge the players to perform each run at max speed! Players will get plenty of rest between each run.
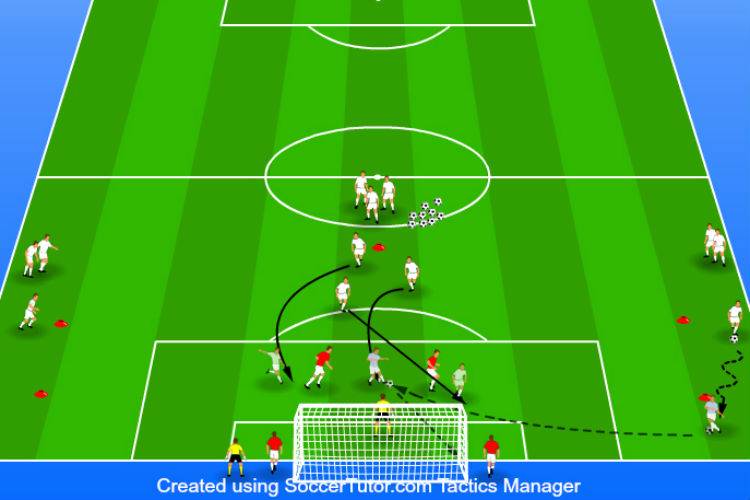
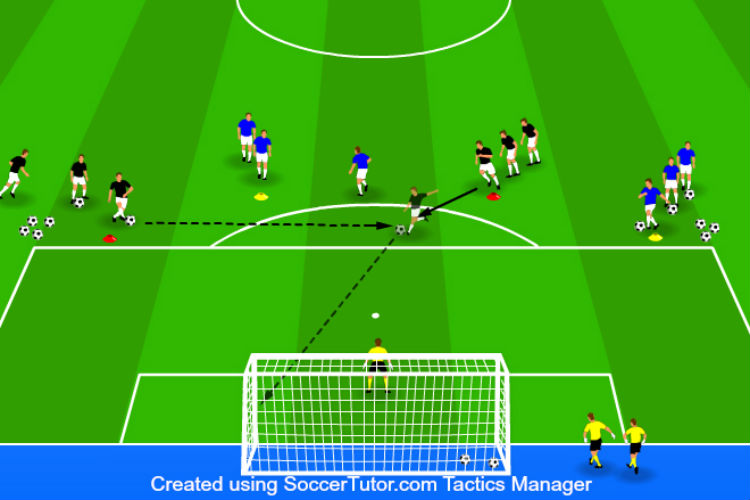
4. Crossing and Finishing
How the Drill Works:
Three players complete a series of one-touch passes before driving a ball out to a wide player near the sideline. The three players run into the box while the wide player dribbles to the end line and delivers a cross for one of the three attacking players. Two defenders and a goalkeeper are added in the box to make the drill more game-like.
Purpose:
Evaluate players and their positional strengths. Wide players are evaluated on their first touch and ability to deliver consistent, quality crosses. Defenders are reviewed on their ability to win balls in the box and prevent goals. Attackers are tested on their ability to drive long balls and finish inside the box. Goalkeepers can also be checked to see their range in the box and shot-stopping ability. Great activity to evaluate players and the specific skills that are required for their positions.
Setup:
- See diagram below for an understanding.
- One full sized goal is needed and is positioned on the end line.
- Place one cone five yards outside of the center circle, in the middle of the field. This is the cone all of the attackers (forwards, center midfielders, and other players) will start.
- Place two cone on each side of the field. The cones should be seven yards from the sideline and should be 10 yards apart. These cones will be the starting areas for all wing players (outside backs and midfielders).
- Two defenders (center backs, center midfielders, or other players) start inside the box while the other defenders rest on the sides of the goal. At least four defenders are needed and will be assigned a different jersey color than attackers.
- Position one goalkeeper in goal with the extra goalkeepers on the sides of the goal. Goalkeepers will rotate in every 3-5 repetitions.
- All the soccer balls should be around the attacking starting cone.
- Decide on the time limit for this activity. Three rounds of 5-7 minutes should be plenty of time for players to rotate positions and showcase their skills.
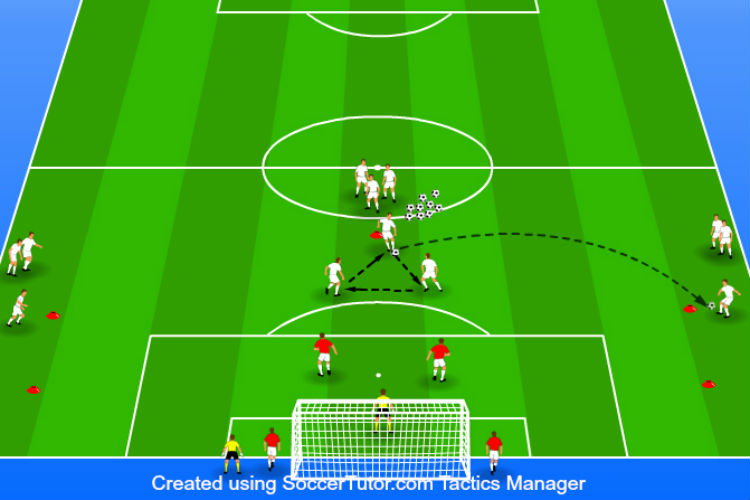
Instructions:
- Three attackers step out in front of the starting cone and form a triangle. The players complete 3-5 one-touch passes before one of the attackers takes two-touches and drives a long ball out to one of the wide players.
- The wide player receives the pass and begins dribbling towards the end line. At the same time, the three attackers are making runs into three separate areas of the box (front, middle, back).
- Once the wide player has passed the cone closest to the end line, they are free to cross the ball into the box. The wide players attempt to pick out an attacker and deliver the ball on the attacker’s head or foot.
- The two defenders in the box are live to defend and clear the ball out of danger.
- The attackers attempt to score the cross on goal.
- If a goal is scored, the defenders clear the ball, or the keeper saves the shot, the next ball from the three new attackers is immediately started.
- Defenders complete two turns in a row before switching. Attacking players and wide players go to the back of their respective lines after each turn.
- Attackers alternate driving balls to each side of the field.
- Players stay at their positional cones for the remainder of the round. After 5-7 minutes, players rest, retrieve all the soccer balls, and switch positional lines as needed.
- Perform this activity for three rounds of 5-7 minutes.
Variations:
One-touch – Complete this exercise using only one-touch at all positions. For experienced players only.
Defenders – Use less defenders if attackers are not getting any shots on goal. If one defender is still too much, perform the exercise without defenders so that attackers and goalkeepers can be assessed.
Coaching Points:
- Teach the players to make hard runs into the box to be the first to the ball and score!
- Remind the defenders to be aware of the incoming attackers so they can successfully clear the ball and avoid danger.
- Encourage the players to compete with each other and try to be the first to the ball every time!
- Educate the wide players to pick up their heads and pick out a player or open space to deliver the ball into.
- Challenge the players to score as many goals as they can! Challenge the goalkeepers and defenders to keep a clean sheet!
5. Four In, Four Out
How the Drill Works:
Teams of eight players play possession with four of their players inside the square and four of their players along the outside of the square. Players are free to use their teammates along the outside of the square to keep possession while the other team’s four players in the middle attempt to win the ball back.
Purpose:
Evaluate players’ possession and decision-making abilities. Players will work to keep possession of the ball for their team with their speed of play and proper choices. Players will also be asked to work hard and smart on defense to win the ball back.
Setup:
- Use four cones to mark a square 25x25 yards. Add, or subtract, space as needed to create to optimum space for the player level.
- Use four more cones to mark the middle of each sideline of the square.
- Divide the players into two teams of eight players. Assign different jersey colors to each team.
- Have four players from each team start in the middle of the square.
- Have the remaining four players from each team position themselves along the outside of the square between two cones. The outside spots should alternate teams so that two teammates are not standing next to each other. See diagram for more information.
- Gather all the soccer balls into a pile close to the field for the coach to pass new soccer balls in as balls leave the area.
- Decide on the number of games and time limit for each game. Four games of 3-4 minutes is a good reference.
Instructions:
- The round begins with the coach passing a ball into either team.
- Teams attempt to keep possession of the ball for as long as they can while the other team attempts to win the ball back.
- Only the four players inside the square can defend the eight players who are on offense.
- Teams with possession can use both the players inside the square as well as their teammates along the outside of the square.
- Players on the outside of the square can move anywhere along their line between their two cones.
- If the ball goes out-of-bounds at any point, the coach starts a new ball with the team who did not last touch the ball.
- Play continues in this manner for the remainder of the round. The four players on the inside move to the outside after the end of the round.
- Play four rounds of 3-4 minutes. Add more time or rounds as needed.
Variations:
Numbers – If there are more than eight players per team, adjust the size of the square and add more players to the inside of the square while keeping the four players along the outside.
Pass and change – Players switch with the teammate they passed the ball to on the outside. This allows for players to enter and leave the inside of the square as the game progresses.
Touch limit – Set a touch limit for the players inside and outside of the square. The touch limit could be the same, or different, for the inside and outside players. Increase the speed at which players must think with a lower touch limit.
Competition – Ten consecutive passes equals one point. Adjust the consecutive pass number as needed for teams to score. Team with the most points at the end of each round is the winner.
Coaching Points:
- Teach the players to constantly move and give good angles of support to each other.
- Remind the players to talk and communicate on both offense and defense.
- Educate the players on spacing and stretching the defenders to make it easier to keep possession.
- Encourage the players to play quickly and to keep the ball moving!
- Challenge the defenders to work and win the ball back as fast as they can!
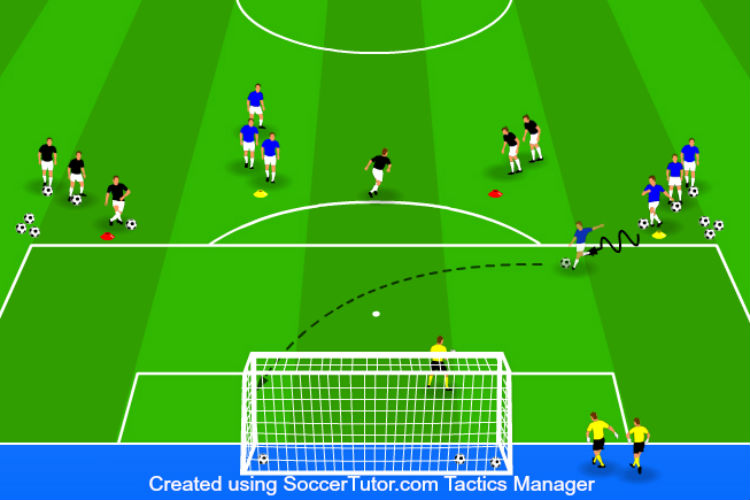
6. Four Line Finishing
How the Drill Works:
Players practice their finishing skills from four different positions on the field. Players work on their one-touch striking and their ability to finish on the dribble.
Purpose:
Evaluate players’ ability to finish around the penalty box at multiple angles and different shooting scenarios. Players will be asked to finish on the dribble and strike a ball one-time off a square pass across the penalty box.
Setup:
- View diagram below for more information.
- One full sized goal is needed and is positioned on the end line.
- Position one goalkeeper in goal. If there are extra goalkeepers, have them stand to the side and rotate in every four, or eight shots.
- Place four cones across the top of the box. The cone on each end should be one yard outside the top of the box and two yards inside the edge of the box. The two center cones should be 5-6 yards outside the box and in line with the two goal posts.
- Have the players divide evenly among the four cones and form lines.
- Separate all the balls between the two wide cones.
- Every player on the wide cones should start with a ball at their feet.
- Decide on the time limit for each round. There should be at least four rounds of 3-6 minutes.
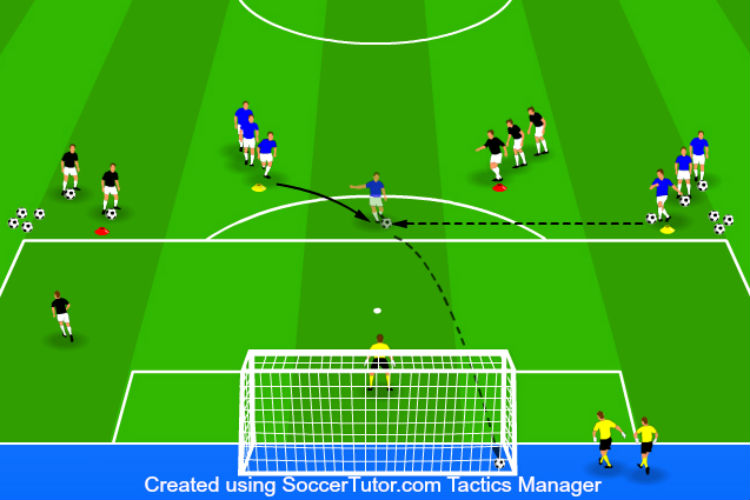
Instructions:
- The activity will start on the goalkeeper’s left and work across to their right.
- The first player on the wide left cone takes 1-3 dribbles towards goal and then strikes the ball on goal. After shooting, they immediately run to the back of their line.
- The second player in line, on the wide left cone, then passes a ball, across the top of the box, to the player on the right center cone. The right center cone player, runs onto the ball and strikes it first time on goal. After shooting, the player immediately runs to the back of their line. The player who passed the ball stays where they are and grabs a new ball.
- Next, the first player on the wide right cone passes a ball across the top of the box to the first player on the left center cone. The player on the center cone, runs onto the ball and strikes it first time on goal. The shooter immediately runs to the back of their line after their attempt. The passer stays in front of their line and quickly grabs another ball to put at their feet.
- Last, the player who just passed the ball from the wide right cone, takes 1-3 dribbles and then attempts to score on goal. The shooter returns to the back of their line after their turn.
- The four shots should be in quick succession so that players are able to get plenty of repetitions and the goalkeepers are challenged to get set quickly after each shot.
- Goalkeepers should rotate every four, or eight shots.
- Players remain in their same lines for the duration of the round. After 3-6 minutes, the round is over and players move one line to their right. Soccer balls are collected and reset after each round. A minimum of four rounds should be completed so that players attempt shots from each of the four lines.
Variations:
Distance/angle – Adjust the distance and angles of the four cones as needed.
Coaching Points:
- Teach the players to look to see where the goal and goalkeeper are before putting their head down and striking the ball.
- Educate the players to keep their ankles locked when striking the ball.
- Remind the players to keep the ball on frame and pick out their corners when possible.
- Encourage the players to score often and consistently!
- Challenge the goalkeepers to move quickly and get set between each shot.
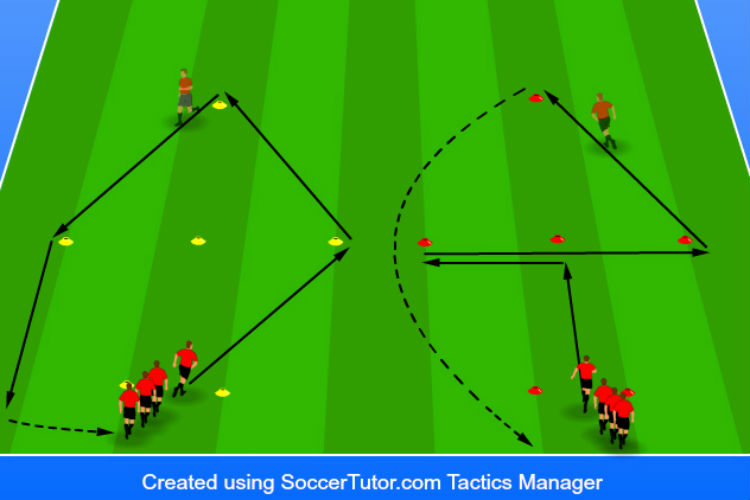
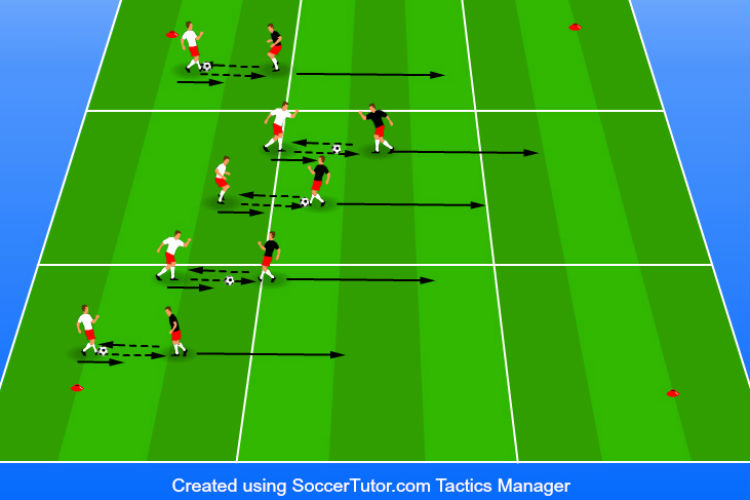
7. Passing Pattern
How the Drill Works:
Players pass, turn and dribble through a series of cones to complete the passing pattern.
Purpose:
Evaluate players’ ability to consistently pass over varying distances and angles. Players will be asked to execute two and one-touch passes to show their precision.
Setup:
- See diagram below for a clear understanding.
- Set up the cones as shown in the diagram. Each side should have four cones in a zig-zag pattern with the first three cones being 15-20 yards away from each other and the final cone 10 yards away from the third cone.
- Have one player on each cone. The extra players will form a line on the cones diagonal from each other. See diagram.
- Divide the soccer balls between the two starting lines.
- The first player in each line starts with a ball at their feet. There will be at least two soccer balls circulating at once.
- Decide on the time limit for this activity. Two rounds of six minutes is a good reference.
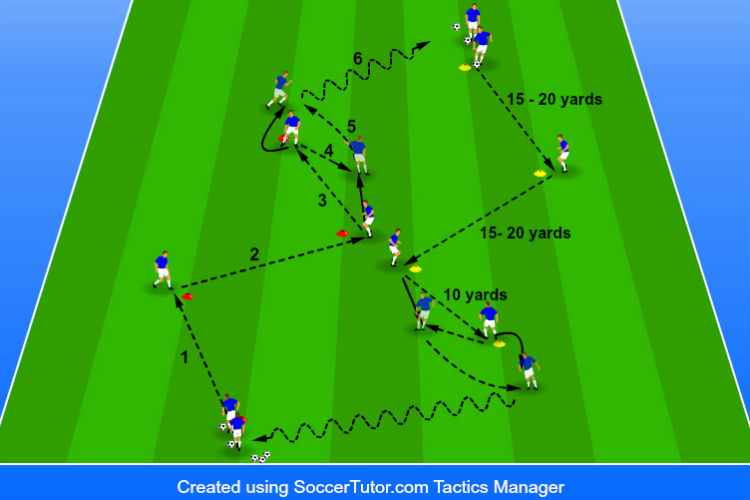
Instructions:
- The first player in each line begins the activity by passing the ball forward to the player closest to them on their left.
- The player on the second cone receives the ball behind the cone, then passes the ball across to the next player.
- The player on the third cone receives the ball behind the cone, then passes the ball forward to the last player.
- The player on the last cone receives the pass in front of the cone, plays the ball back to the third player, runs around the fourth cone and receives a pass from the third player into space.
- The fourth player then dribbles to the back of the next starting line as quickly as they can before resting and waiting for their turn to start again.
- Players follow their pass and move forward one cone after each pass they give.
- The next ball can be started once all the players are set on their new cones. Players should run to the next cone after they complete their pass to keep the pattern moving.
- Continue this pattern for 4-6 minutes before resting, giving specific coaching points, and then repeat for another round.
Variations:
One-touch – Complete this pattern using only one-touch at all cones. For experienced players only.
Up-back-through – The pattern switches to the first player passing to the third cone, who plays the second cone, who plays the fourth cone, who lays the ball to the third cone and runs to receive a pass into space.
Coaching Points:
- Teach the players to receive the ball on their back foot so they can turn and play forwards quickly. Players should step into their pass and keep the ball on the floor.
- Remind players to relax and focus on a good first touch.
- Encourage the players to follow their pass with a run to that cone so the activity can keep moving and players can get more touches.
- Challenge the players to play as quickly and accurately as they can!
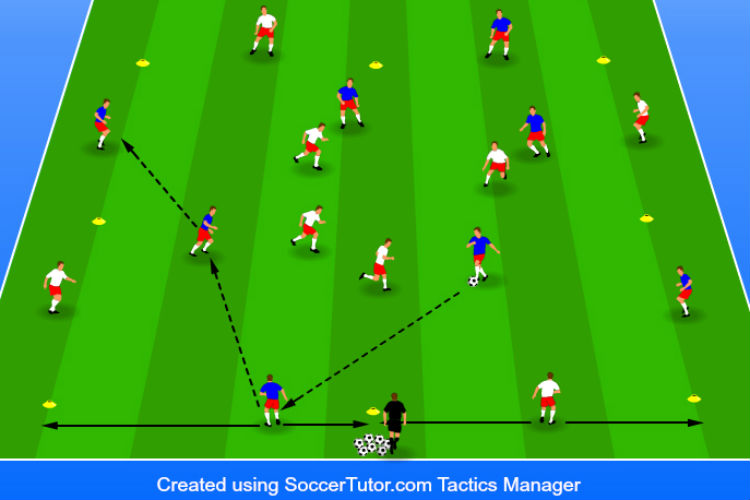
8. Plus 2 Possession
How the Drill Works:
Two teams play possession with the addition of neutral players.
Purpose:
Evaluate players’ abilities to keep possession of the ball in a numbers-up situation. Players can also be evaluated for their defensive work and skill as they attempt to win back the ball as quickly as they can. This small playing area will allow players plenty of touches and challenges to keep the ball.
Setup:
- Use the cones to mark a 30x30 yard field. Increase, or decrease the size of the field depending on the skill level of the players. Less space will challenge higher quality players to play quicker while a larger field will allow players more time on the ball.
- Pick two players to start as neutrals. Neutral players should be players that have good possession skills, if possible. This will help the flow of the game.
- Divide the rest of the players in to two teams of five players. Assign each team a different jersey color.
- Make a pile of balls on the outside of the playing area with the coach.
- Decide on the number of games and the time limit for each game. Five games of four minutes are suggested. Add more time and games as needed.
- If there are more than 12 players present, set up two playing areas, or rotate the third team in after each round. More players can also be added to the game, like 6v6+2 or 7v7+3, depending on the numbers available. Adjust the field dimensions accordingly.
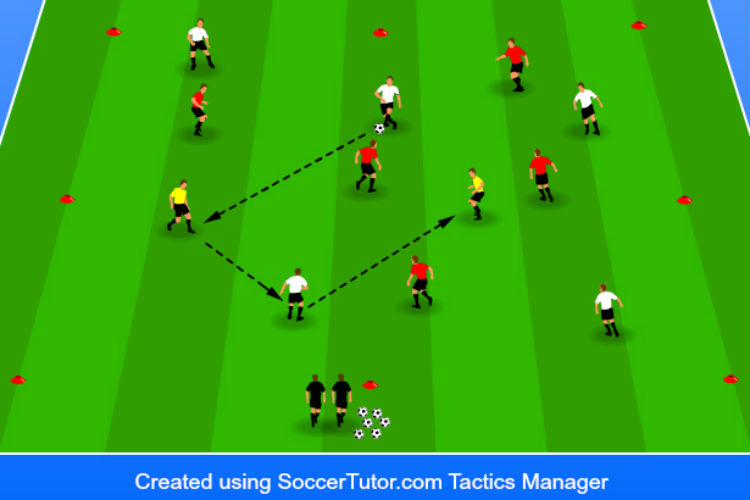
Instructions:
- The coach begins play by passing the ball to one team.
- Teams attempt to keep possession of the ball using their teammates and neutral players.
- The team without the ball attempts to win the ball back as quickly as they can and then maintain possession.
- If the ball goes out-of-bounds at any point, the coach passes a new ball into the square to the team that did not last touch the ball.
- Play continues for the remainder of the round. Players rest for at least two minutes before starting the next round. If time allows, play five games of four minutes. Switch teams and neutral players as needed.
Variations:
Touch limit – Give the players a touch limit. 3-touch, 2-touch, or 1-touch. Neutral players can also be given the same touch limit, or a separate touch limit.
Point system – Give the players something to play for by counting consecutive passes and awarding points for every eight passes consecutively connected. This allows players to compete and find a winner for each round. Increase, or decrease, the passing number depending on the skill level of the players.
Coaching Points:
- Remind the players to constantly move on both defense and offense. Players should be looking to stay involved in the game and effect its outcome.
- Encourage the players to play quickly and keep the ball moving! Players should not take more than three touches in this game unless they have to get out of a tight spot.
- Challenge the players to switch from offense to defense, and defense to offense immediately!
9. Technical Warmup
How the Drill Works:
Players partner up and work on passes and volleys while moving forward and backwards.
Purpose:
Get players moving with the soccer ball at the beginning of the session. Players warm their muscles up with light movement and passing patterns. Coaches also can evaluate some players and their abilities to pass and receive the ball while moving.
Setup:
- Use cones to make two, parallel lines, 30 yards apart. Make the lines as long as needed to accommodate all the players.
- Have the players partner up with one and line up along one cone line.
- One partner starts on the line with the ball while the other partner stands 4-5 yards directly in front of them.
- Decide on warmup time. 8-12 minutes should be sufficient before players stretch and prepare for the rest of the session.
Instructions:
- Partners work down to the other cone line and back while performing a technical pattern and maintaining their 4-5 yards of space.
- Patterns could be:
a. One-touch passing.
b. Two-touch passing.
c. The partner moving backwards has the ball in their hands and tosses the ball to their partner moving forward for volleys (inside, outside, two-touch, thigh-foot, head-foot, etc.).
d. Headers.
e. Juggling (one-touch, two-touch, etc.).
f. Be creative. Switch it up. There is no wrong combination. - After players complete one down and back, they rest on the starting line for the rest of the players to return and for the coach to give the next pattern before repeating the process.
- Continue this light technical warmup for 8-12 minutes before stretching and preparing for the rest of the session.
Variations:
Patterns – Give the players new passing patterns every turn, or every other turn. This will keep player engaged and give coaches a first impression of players and the technical abilities.
Distance – Increase, or decrease, the distance between the two cone lines as needed.
Coaching Points:
- Remind the players this is just a warmup and the actual speed of play and touches is not important. The main focus is to get their bodies moving and to begin to get them touches on the ball before jumping into the rest of the session.
- Teach the players to remain on balance while performing the passing patterns.
- Encourage the players to slowly increase their speed and focus as they work through the warmup. Players should be mostly warm and fully focused by the time the warmup is over.
10. Roll-On, Roll-Off 3v3
How the Drill Works:
Teams of three play quick-fire games against one another, with a twist. As soon as the attacking team loses the ball, they’re out, and their opponents become the attackers. The next team in line must run onto the field as the new defending team. This process continues.
Purpose:
In addition to assessing players’ skill sets in a 3v3 mini-game, this drill also helps you determine players’ communication skills and abilities to function well in a team.
Setup:
Create a 20 x 10-yard field with mini-goals on either end.
Split up all players into groups of three (there are no goalkeepers).
As two teams compete, the next team watches and waits for their chance on the sideline.
If you have a lot of players at the tryout, set up multiple mini-fields.

Instructions:
Two teams compete at a time, with one being the attacking side and the other being the defending team.
On the coach’s whistle, the game goes live and the attacking team tries to score.
If the attackers score, the defenders are eliminated and a new team takes their place as defenders.
The attacking team stays on and starts the next round with the ball.
If the defenders win possession, the attackers are immediately eliminated, and the defenders become the new attackers.
The next team rushes onto the field to defend the attack.
All players waiting on the sideline must stay alert to make sure they know when to enter the field.
The drill goes on like this for a set amount of time (around 10 minutes).
Variations:
Time limit - Set a time limit for scoring a goal (15 to 20 seconds).
Touch limit - Limit attacking teams to a certain number of touches, forcing them to be direct and aggressive.
Scoring box - Create a small “penalty box” to mark where goals can be scored from. Players can’t score from outside this box.
Coaching points:
This drill creates a frantic environment, allowing you to pay attention to how players perform under pressure.
The fast-paced games also ensure you can analyze players’ technical abilities in both attack and defense.
Successful teams are typically those that communicate and work together, helping you determine team players and leaders.
11. 3 Goal Mania
How the Drill Works:
Teams of four compete against one another on a small pitch. However, instead of having traditional goals on either end, there are three mini-goals along each end line.
Purpose:
As a 4v4 drill, the drill allows you to analyze teamwork and technical skills, as well as decision-making and positioning.
Setup:
Create a mini-field that’s 20 yards long and 30 yards wide.
Set up three mini-goals on each end line (there are no goalkeepers)
Split the tryout group into teams of four.
Two teams compete at a time with the next team waiting their turn on the sideline.
If you have a lot of players, consider setting up multiple fields.
The coach starts with the ball.

Instructions:
The coach starts the drill by kicking the ball onto the field.
Once the ball enters the pitch, the game is live and the teams can compete for possession.
From here, they play a normal 4v4 match.
The main difference is that the teams can score in one of three goals.
The first team to score five goals wins.
After the game, the losing team goes off but the winners stay on.
Variations:
Minimum pass limit - Each team has to make a set number of consecutive passes before they score.
Same goal rule - Players can’t score in the same goal twice in a row.
Tournament - Create a tournament between all the teams.
Coaching points:
The unusual setup means players have to use the full width of the field and take up good positioning. These are core aspects to look out for.
Players will have to communicate effectively to prevent the opposition from scoring easy goals, helping you identify good talkers, organizers, and leaders.
Although you can interfere to give instructions, it’s best to let the players adapt and perform freely.
What's Next?
Once your tryouts are over, it's time to figure out what drills you'll use during the season.
If you're looking for ideas, check out all of our soccer drills on this link.