10 Soccer Drills for Beginners (2024 Update)
Drills have an important role to play in the sport of soccer, especially for beginners.
They help players work on key movements and skills, solidifying them as muscle memory.
When looking for soccer drills to use for beginners, it's crucial to find a balance between development and having fun.
Spending too much time on "technique-focused drills" can become boring and repetitive, causing young players to lose interest in the sport.
The following list contains 8 excellent soccer drills for beginners that not only help them acquire skills, but also enjoy playing the game of soccer.
10 Soccer Drills for Beginners
1. Pass and Shuffle Pairs
Pass and shuffle pairs is a simple drill that works wonders with a player’s first touch, close, ball control, and short passing.
In a team setting, it can be easily scaled by dividing the team into pairs.
The focus of this drill should be on smooth ball control and crisp passing.
Equipment:
- 2 cones per pair
- 1 ball per pair
Drill Setup:
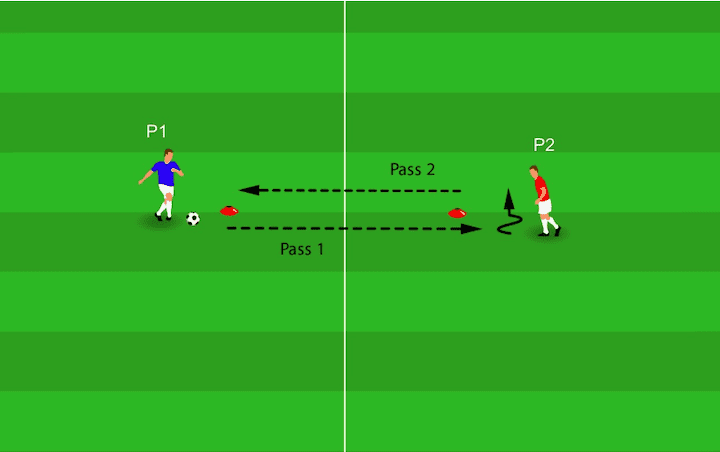
Place 2 cones approximately 10 feet apart, indicating the starting points for each player.
P1 stands slightly behind and to the right of the cone with a ball.
P2 stands in a mirrored position behind the second cone.
If there are more than two players, divide the team into pairs and set up multiple identical drill stations.
Instructions:
1. On the coach’s signal, P1 passes the ball to P2, then shuffles to the opposite side of the cone (right to left)
2. P2 takes one or two touches to shift the ball from one side of the cone to the other, before playing a return pass to P1
3. P2 then shuffles back to the starting position to await the next pass
4. P1 receives the ball and takes one or two touches to shift the ball to the opposite side of the cone, before playing another pass to P2
5. Players repeat this drill until they complete a certain number of passes. For more advanced players limit the number of touches and increase the passing distance
2. Possession Squares
There has never been such a strong emphasis on keeping possession in the game of soccer.
Nowadays, coaches want all of their players to be competent on the ball and comfortable playing out from the back, even under pressure.
Possession squares is one of the best soccer drills for beginners since it's a fast and fun way to instill passing and movement in players.
Moreover, it helps them eliminate the fear of receiving the ball in tight spaces and working their way out of trouble.
Equipment
- 4 cones
- 1 ball
Drill Setup
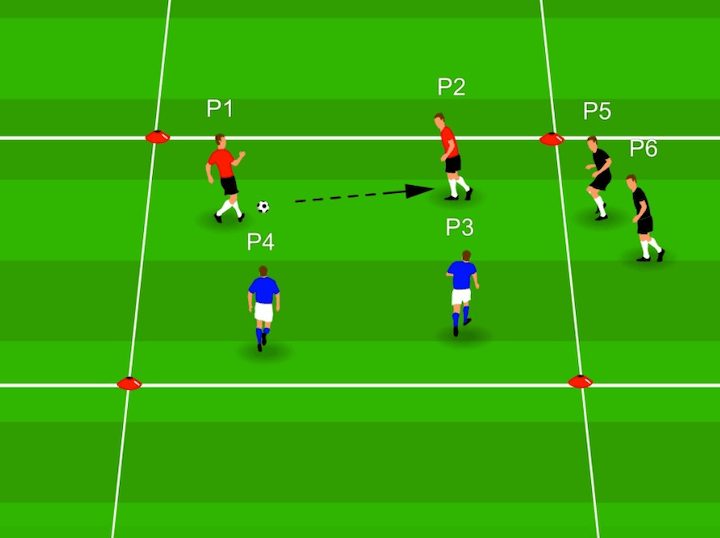
Create a 4-cone square grid with each cone around 15 feet apart
Divide the team into pairs
Two pairs compete against each other at a time
If you have a large team, create multiple squares so more players can participate simultaneously
Instructions
1. The coach selects two teams to go first and decides which pair will start with the ball
2. Before the drill begins, the defenders (team without the ball) must stand at least 5 feet away from their opponents
3. On the coach’s signal, the game goes live
4. The team in possession must try to hold on to the ball, while the other team attempts to get it from them
5. If the team in possession completes 5 consecutive passes, the defending team gets eliminated, and the next pair comes in
6. If the defending team wins the ball back, the round gets reset with each team switching roles
7. If there is no winner after 3 rounds, both teams get replaced by fresh pairs
8. Coaches can scale this drill easily by adjusting the size of the square or changing the number of players per team
3. One-Two Pass and Shoot
While many drills focus on technique and skill mechanics, others replicate in-game scenarios.
The one-two pass and shoot involves practicing a common and highly effective sequence to help open up the defense on the edge of the penalty box.
It's one of the best soccer drills for kids as it combines several core skills that translate directly to the field: one-touch passing, movement, and shooting.
Equipment
- 2 cones
- 1 ball (minimum)
- 1 goal
Drill Setup
Set up goalposts
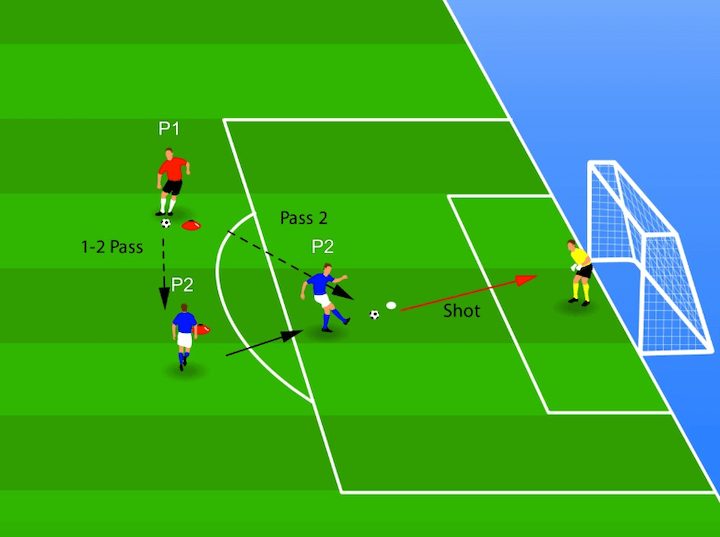
Place one cone around 30 feet from the center of the goal
Place another cone parallel to the first, approximately 10 feet away
P1 stands at the first cone with the rest of the team lining up behind them
P2 stands at the second cone
If you have a goalkeeper, use them for this drill
Instructions
1. P1 starts with the ball
2. On the coach’s signal, P1 plays a quick one-two pass with P2
3. After completing the return pass, P2 makes a run toward the goal
4. P1 makes a through pass to meet the run of P2
5. P2 takes a touch if necessary, then shoots on goal
6. P1 then takes P2’s spot at the second cone and the next player in line takes P1’s spot
7. Repeat the drill for a set period of time or until the team scores a certain amount of goals
4. Pass, Turn, and Shoot
If you ask most young players what their favorite part of soccer is, the most popular answer is always scoring.
This is not only a great shooting drill, but also teaches receiving the ball on the turn.
It is a valuable exercise for midfielders and strikers as it allows them to practice a direct passing and shooting sequence that is likely to occur in any game.
Equipment
- 2 cones
- 1 ball (minimum)
- 1 goal
Drill Setup
Set up goalposts
Place one cone around 30 feet from the center of the goal
Place another cone 40 feet from the goal, in line with the first
P1 stands at the furthest cone with the rest of the team lining up behind them
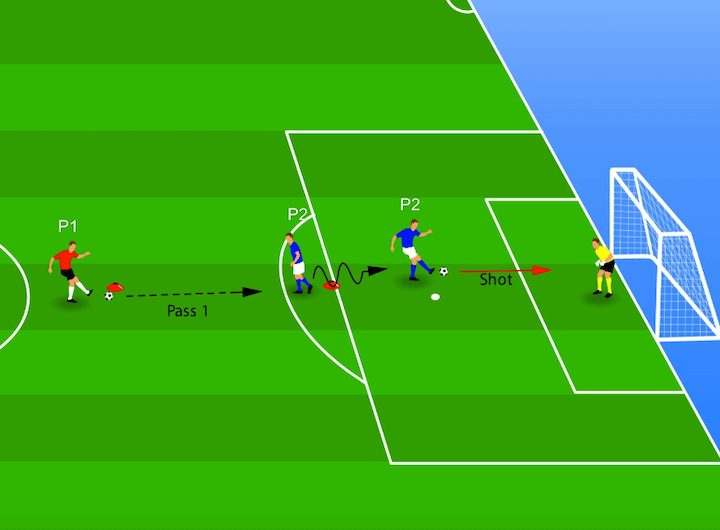
P2 stands at the cone nearest the goal, facing P1
If you have a goalkeeper, use them for this drill
Instructions
1. P1 starts with the ball
2. On the coach’s signal, P1 makes a low, firm pass to P2 (with their back to goal)
3. P2 takes a touch to control the ball then spins toward goal and carries the ball into the imaginary penalty box
4. P2 has a 1v1 with the goalkeeper and attempts to score
5. If there is no goalkeeper, P2 should shoot quickly after turning
6. P1 takes P2’s spot and the next player in line takes P1’s spot
7. Repeat the drill until each player gets at least 3 attempts on goal
8. For advanced players, limit the number of touches P2 can take or instruct them to complete the drill using their weaker foot
5. Cone Weaves
Cone weaves is one of the drills that are a staple training ground exercise at all levels, from kids to professionals.
This type of drill is used mainly as a warmup routine but it is an excellent skill-development exercise for beginners.
It's one of the more effective soccer drills for beginners as it teaches players to dribble closely while staying vigilant of their surroundings.
Cone weaves can also be very fun and satisfying for younger players as they can improve rapidly.
Equipment
- 5 cones
- 1 ball
Drill Setup
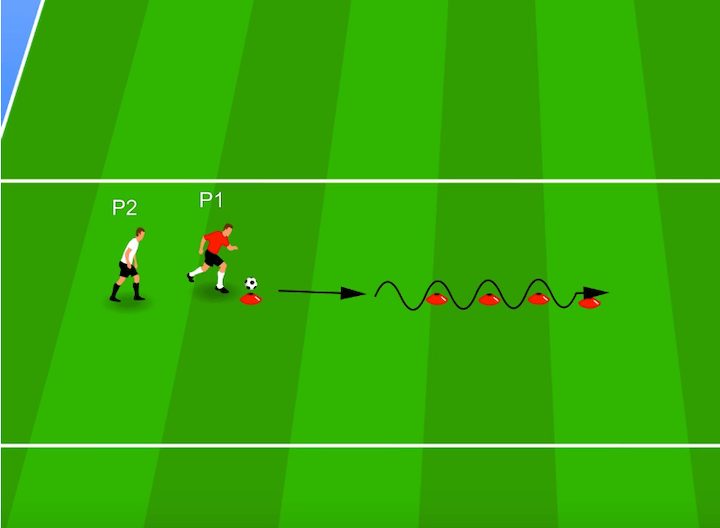
Set down one cone to mark the starting point
Create a 4-cone weave starting 10 feet from the starting point
There should be a 1 to 2-foot gap between each cone
If you have a big squad, consider setting up multiple weaves, allowing each player to get more practice time in
Instructions
1. P1 begins with the ball at the starting point
2. All other players line up behind P1 awaiting their turn
3. On the coach’s signal, P1 sprints with the ball toward the first cone of the weave
4. P1 then dribbles in and out, passing through each cone
5. After reaching the end, P1 turns around and completes the weave from the opposite side
6. At the final cone in the weave, P1 passes the ball to the next player in line
7. Each player repeats the same actions
8. If you want to add an element of fun, consider dividing the team into even groups and allow them to race against one another to see which group finishes the weave first
6. Dribble, Turn, and Pass
The following drill is useful for players in every position.
It helps them get comfortable dribbling the ball, turning quickly, and laying it off to a teammate.
There is also an element of fun to the exercise as it challenges players to improve the speed at which they dribble and turn.
Equipment
- 2 cones
- 1 ball
Drill Setup
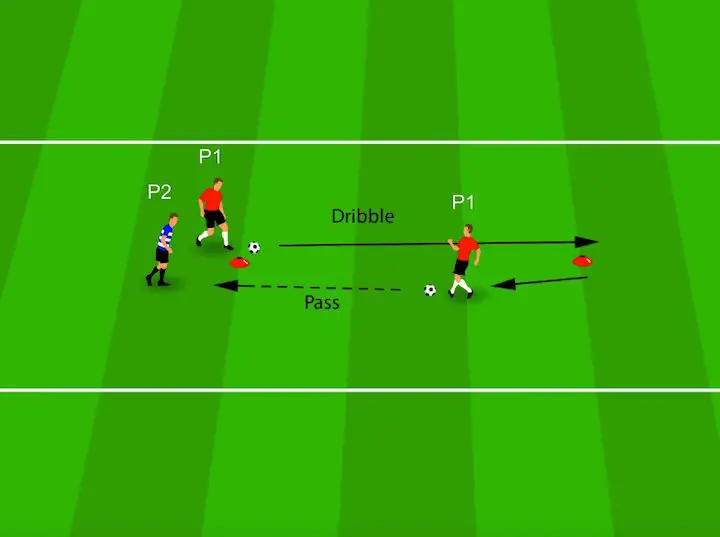
Place 2 cones 15 to 20 feet apart in a straight line
All players line up behind P1 at the first cone
Set up multiple drill stations if you have enough players: this allows you to create races or competitions
Instructions
1. P1 starts with the ball
2. On the coach’s signal, P1 dribbles as fast as they can (in a controlled manner) to and around the second cone
3. After rounding the second cone, P1 passes the ball to the next player and then joins the back of the line
4. Players continue this drill for a set period of time
5. To add some fun to the drill, set up multiple drill states, divide the team into groups, and have them race against each other
Remember: the focus should be on dribbling technique first foremost, speed comes second
7. Passing Pairs
This is one of the best drills to practice their first touch and passing technique.
It requires minimal equipment and can be replicated in the backyard as well.
Equipment
- 2 cones per pair
- 1 ball per pair
Drill Setup
- Divide the team into pairs
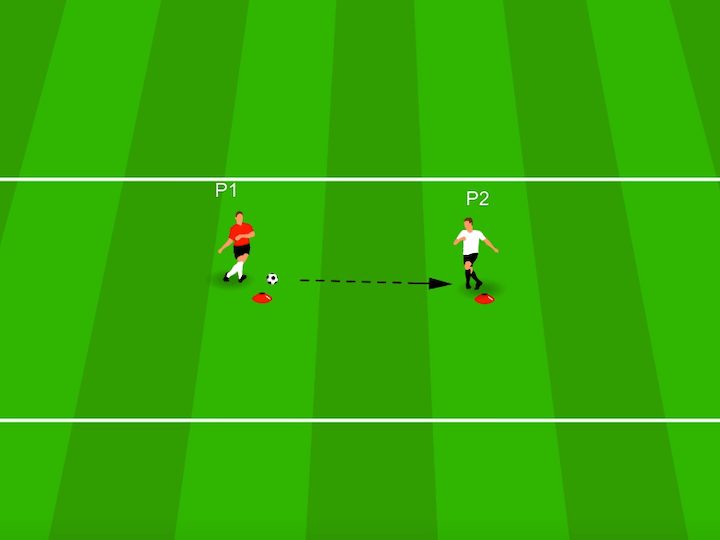
- Place 2 cones around 5 to 10 feet apart for each pair
- P1 stands at one cone with the ball, while P2 stands at the other without one
- For the majority of this drill, one player serves (P1) for the passer (P2)
Instructions
Round 1: P1 lobs the ball gently toward P2, who side-foots the ball back to P1 first-time
Round 2: P1 lobs the ball toward P2’s mid-section; P2 controls the ball with their thigh then volleys the ball back to P1
Round 3: P1 lobs the ball gently into the air toward P2, who controls the ball with their chest and then passes the ball back to P1
Round 4*: P1 lobs the ball into the air, then P2 heads the ball back to P1
Round 5: P1 and P2 play two-touch floor passes back and forth to one another
Round 6: P1 and P2 play one-touch floor passes back and forth to one another
*Players should only head the ball if they are old enough (usually 10 years and older).
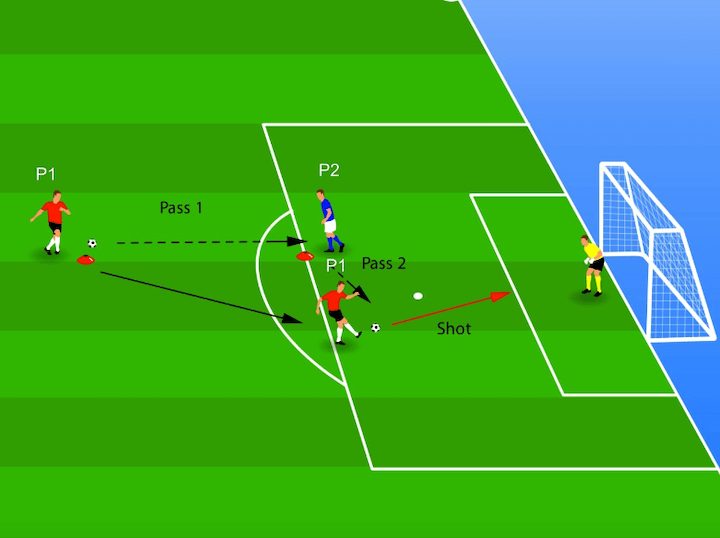
8. Give-and-Go Shooting
Give-and-go passes, or one-twos, are a huge part of soccer at every level.
This helps players open up space or get out of congested areas.
One of the most standard attacking scenarios in a game is a give-and-go at the edge of the penalty box, followed by a strike on goal.
That is precisely what this drill replicates.
Equipment
- 2 cones
- 1 ball (minimum)
- 1 goal
Drill Setup
Set up goalposts
Place one cone around 30 feet from the center of the goal
Place another cone 40 feet from the goal, in line with the first
P1 stands at the furthest cone with the rest of the team lining up behind them
P2 stands at the cone nearest the goal, facing P1
If you have a goalkeeper, use them for this drill
Instructions
1. P1 starts with the ball
2. On the coach’s signal, P1 makes a low, firm pass to P2 (with their back to goal)
3. P1 then runs toward goal on either side of P2
4. P2 takes a touch if necessary, then lays the ball off for P1
5. P1 shoots first-time if possible, or takes a touch to control the ball before shooting
6. P1 rejoins the back of the line and the next player repeats the drill
7. Rotate P2 occasionally, ensuring all players get the chance to lay the ball off
9. Pass-Cross-Shoot
Pass-Cross-Shoot works on a variety of skills that beginners must learn: passing, first-touch, crossing, shooting, and movement.
Unlike some other drills, this exercise is based on in-game situations, which gets beginners used to different positions and responsibilities.
The main focus of this drill should be skill development. Speed and finishing aren’t priorities until all players are accustomed to the sequence.
Equipment
1 goal
1 ball
3 cones
Drill Setup
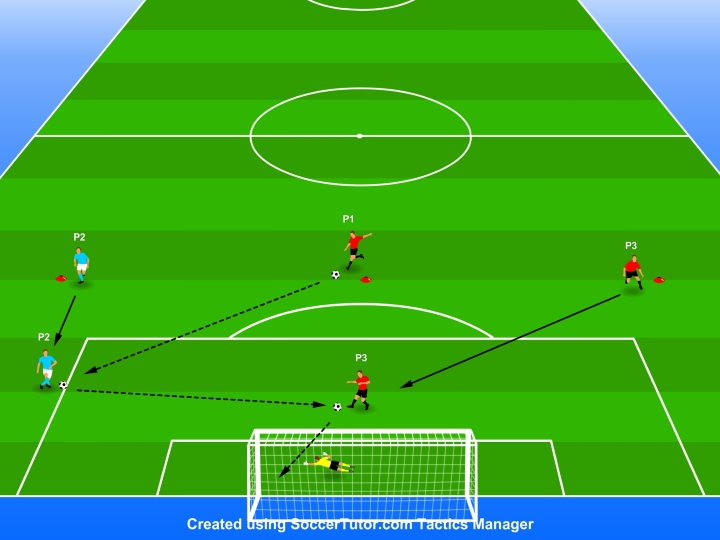
Use the penalty box and surrounding space for this drill
Or, if you have young players, create a smaller version.
Set up a goal and use a goalkeeper if you have one available
Place three cones in a line outside the penalty box (one to the right, one in the center, and one to the left)
Divide your players into three groups, with each group lining up behind a cone
Instructions
P1 kicks off the drill by passing the ball to P2 who’s positioned out wide
P2 takes a touch to control the ball and then accelerates down the wing
Once the first pass is played, P3 (on the opposite side), begins their run into the box
P2 looks up, times P3’s run, and crosses the ball to them
P3 shoots first time or takes one touch to control and then finishes
Each player joins a different line
The drill continues with the next group
10. Dribble-Pass-Move
It’s important for beginners to gradually put different skills together.
Two of the most important aspects of the game are passing and dribbling.
Dribble-Pass-Move is a very straightforward but vital drill that replicates the most common action in a game: dribbling, passing, and moving.
From the early stages, it’s extremely important to get players to form good habits, such as moving after a pass.
While static drills are useful in developing individual skills, motion-based exercises are more relevant to games.
Equipment
1 ball
3 cones
Drill Setup
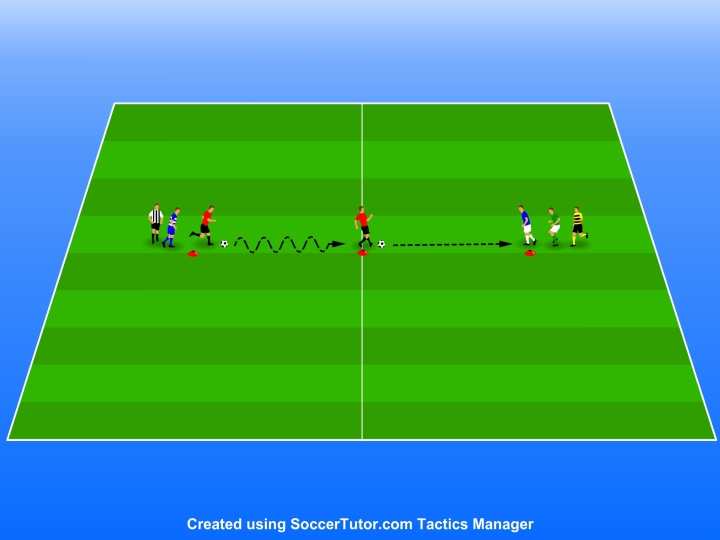
Position three cones in a straight line, approximately five yards apart from each other
Split the team into two groups, with each group lining up behind the cones on the outside of the grid
If you have a large squad, set up multiple grids for multiple groups
P1 starts with the ball
Instructions
P1 begins the drill by dribbling to the cone in the center
Once P1 reaches the center cone, they look up and pass the ball to P2
P1 then joins the end of P2’s line
P2 completes the same set of actions - dribble, pass, and move - but from the opposite side
Repeat the drill for around five minutes
If the drill is too easy, increase the distance between the cones
Once your players are performing the drill consistently well, work on weak-foot passing
Conclusion
Whether you’re a coach or a parent, knowing basic soccer drills for beginners is a must.
In such a technical sport, players must build solid foundations before they can handle more advanced tactics or techniques.
The drills outlined above are ideal for creating the framework for training sessions for the preseason and the regular season.
Many can also be adapted for individual training in the backyard.
Once players are comfortable with these, check out our full collection of drills.

